Access meeting audio with the RTMS SDK
This quickstart is for meetings, but can easily be repurposed for webinars. Just replace the meeting scopes and events with their webinar equivalent. For example, replace
meeting.rtms_startedwithwebinar.rtms_started.
For this quickstart, we'll use the Realtime Media Streams (RTMS) SDK to print meeting audio to our terminal. Our app will join a meeting with a user using the auto-start feature.
The RTMS SDK is helpful, but not required!
To create your own WebSockets follow the quickstart to Get transcripts using WebSockets.
Follow along with this video to complete the quickstart.
In this quickstart we will:
- Create a server on a local tunnel
- Install the RTMS SDK
- Enable RTMS features on a Zoom app
- Access real-time meeting audio
If you're looking for a more in-depth guide to connect to RTMS streams, see sample apps & recipes.
Step 1: Clone the quickstart app and install the RTMS SDK
To get started, we need to clone the repository from GitHub and install the RTMS SDK.
-
Run the command to clone the RTMS quickstart app NodeJS app.
git clone https://github.com/zoom/rtms-quickstart-js.git -
Run the command to navigate into the project and install dependencies. This installs the RTMS SDK. For more information, see the SDK Reference.
cd rtms-quickstart-js npm install -
Run the command to clone the RTMS quickstart app Python app.
git clone https://github.com/zoom/rtms-quickstart-py.git -
Run the command to navigate into the project, create a virtual environment, and install dependencies. This installs the RTMS SDK. For more information, see the SDK Reference.
# Create virtual environment
python3 -m venv .venv
# Activate virtual environment
source .venv/bin/activate  # On Windows: .venv\Scripts\activate
# Install dependencies
pip install python-dotenv
# Install the SDK
pip install rtms
Run the command to copy the example environment file. We'll add credentials to this file in Step 4.
cp .env.example .env
Step 2: Create an RTMS client on a local tunnel
Open the project in your code editor. The following code uses the RTMS SDK to:
- Create a webhook event handler for
meeting.rtms_started - Create a client to connect to an RTMS server using the webhook event's payload
- Show an example of setting media params
- Handle audio data
- Log data to the console
To create an RTMS client on a local tunnel
-
Replace any code in your
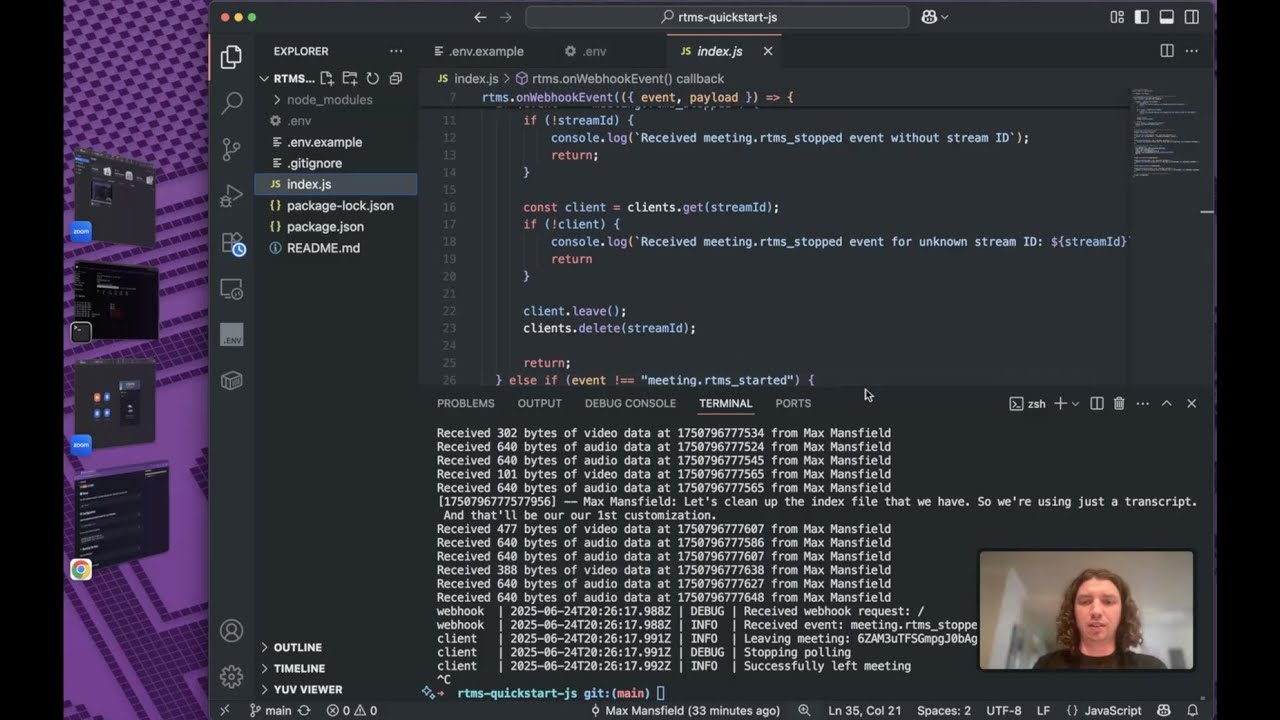
index.jsfile.// Import the RTMS SDK import rtms from "@zoom/rtms"; let clients = new Map(); // Set up webhook event handler to receive RTMS events from Zoom rtms.onWebhookEvent(({ event, payload }) => { const streamId = payload?.rtms_stream_id; if (event == "meeting.rtms_stopped") { if (!streamId) { console.log( `Received meeting.rtms_stopped event without stream ID`, ); return; } const client = clients.get(streamId); if (!client) { console.log( `Received meeting.rtms_stopped event for unknown stream ID: ${streamId}`, ); return; } client.leave(); clients.delete(streamId); return; } else if (event !== "meeting.rtms_started") { console.log(`Ignoring unknown event`); return; } // Create a new RTMS client for the stream if it doesn't exist const client = new rtms.Client(); clients.set(streamId, client); client.onAudioData((data, size, timestamp, metadata) => { console.log( `Received ${size} bytes of audio data at ${timestamp} from ${metadata.userName}`, ); }); // Join the meeting using the webhook payload directly client.join(payload); }); -
Replace any code in your
main.pyfile.import rtms import threading from dotenv import load_dotenv load_dotenv() # Store active clients by stream ID clients = {} # Queue for pending client setups (webhook thread -> main thread) pending_setups = [] pending_lock = threading.Lock() @rtms.onWebhookEvent def handle_webhook(webhook): event, payload = webhook.get('event'), webhook.get('payload', {}) stream_id = payload.get('rtms_stream_id') if event == 'meeting.rtms_stopped': if not stream_id: print('Received meeting.rtms_stopped event without stream ID') return client = clients.get(stream_id) if not client: print(f'Received meeting.rtms_stopped event for unknown stream ID: {stream_id}') return client.leave() del clients[stream_id] return if event != 'meeting.rtms_started': print('Ignoring unknown event') return # Queue this for processing on main thread (client creation must happen there) with pending_lock: pending_setups.append(payload) def process_pending_setups(): """Process pending client setups - must be called from main thread""" with pending_lock: if not pending_setups: return setups = pending_setups[:] pending_setups.clear() for payload in setups: stream_id = payload.get('rtms_stream_id') # Create client on main thread so _main_thread_id is correct client = rtms.Client() clients[stream_id] = client @client.onAudioData def on_audio(data, size, timestamp, metadata): print(f"Received {size} bytes of audio data at {timestamp} from {metadata.user_name}") # Join (now _process_join_queue isn't needed since we're on main thread) client.join( meeting_uuid=payload.get('meeting_uuid'), rtms_stream_id=payload.get('rtms_stream_id'), server_urls=payload.get('server_urls'), signature=payload.get('signature') ) if __name__ == '__main__': import time try: while True: process_pending_setups() for client in list(clients.values()): client._poll_if_needed() time.sleep(0.01) except KeyboardInterrupt: for client in clients.values(): client.leave() -
Expose this app on a local server over HTTPS. For this quickstart, we'll use ngrok. You can also use Cloudflare Tunnel, localtunnel, or other alternatives.
-
Open a new terminal window and run the command to open an HTTPS forwarding URL at port
8080. This outputs a public URL we'll use to receivemeeting.rtms_startedwebhook events.ngrok http 8080
Step 3: Set up a Zoom app to use RTMS
The next step is to set up an RTM-enabled app with the meeting:read:meeting_audio scope. For more information, see Add Realtime Media Streams to your app .
Now that you've created the app, we need to add the ngrok URL from the previous step to your app and add your app to your account so we can test our implementation.
To add your ngrok URL and add your app
- Sign into the Zoom App Marketplace.
- To go to the app, in the upper-right of the screen, choose Manage.
- Select your app from the list.
- In the navigation pane, choose Basic Information.
- In the OAuth Information section, for OAuth Redirect URL, add your ngrok URL.
- In the navigation pane, choose Local Test.
- In the Add app section, choose Add app now.
- On the page that appears, choose Allow. The page will then redirect to a page that doesn't exist because we didn't set up OAuth on our ngrok URL.
Now that the app is installed it's time to add the credentials to your .env file.
Step 4: Add credentials to .env file
Now that your app is created, we need to add the credentials to our .env file so the server can communicate with the app.
To add the credentials
- Sign into the Zoom App Marketplace.
- To go to the app, in the upper-right of the screen, choose Manage.
- Select your app from the list.
- Copy the Client ID and Client Secret.
- Open the
.envfile in your project and paste the client ID and secret.ZM_RTMS_CLIENT= the client ID from your app.ZM_RTMS_SECRET= the client secret from your app.
- Save the file.
Now you're ready to test the server and app combination.
Step 5: Start the app and join a meeting
Now that your app is installed, your account may need to give permission to apps to access meeting content.
Navigate to your account settings page (as an account admin) and enable apps to share realtime meeting content with apps.
For this quickstart, we want to show how a user can auto-start an RTMS session whenever they join a meeting. Because you've installed the app for your user, you'll now be able to set the app to auto-start in your Zoom settings.
To set RTMS to auto-start
- Open your Zoom settings.
- Choose the Zoom Apps tab.
- In the Auto-start apps that access shared realtime meeting content section, choose + Choose an app to auto-start.
- From the dropdown, select your RTMS app, and choose Save.
To test your app
-
Run the command to set up the server to listen to incoming webhook events anytime the app is launched in a meeting.
npm run startpython main.py -
Log into the Zoom desktop client as the user who has installed the app.
-
Launch a Zoom Meeting.
Realtime Media Streams will launch as the meeting begins. The RTMS SDK will now log audio RTMS events and audio data to the terminal:
webhook  | 2025-07-08T05:42:53.395Z | DEBUG | Received webhook request: /
webhook  | 2025-07-08T05:42:53.395Z | INFO  | Received event: meeting.rtms_started
client   | 2025-07-08T05:42:53.395Z | DEBUG | Setting video parameters: {"contentType":3,"codec":7,"resolution":1,"dataOpt":3,"fps":30}
client   | 2025-07-08T05:42:53.395Z | DEBUG | video parameters set successfully
client   | 2025-07-08T05:42:53.395Z | DEBUG | Setting deskshare parameters: {"contentType":3,"codec":7,"resolution":1,"dataOpt":3,"fps":30}
client   | 2025-07-08T05:42:53.396Z | DEBUG | deskshare parameters set successfully
rtms     | 2025-07-08T05:42:53.396Z | DEBUG | SDK already initialized
client   | 2025-07-08T05:42:53.396Z | INFO  | Joining meeting: 12rg1/3FSzihG3R0yOjb4A==
rtms     | 2025-07-08T05:42:53.396Z | DEBUG | Generating signature for client: aaabbbcccdddeeefffgggx, uuid: 12rg1/3FSzihG3R0yOjb4A==, streamId: 123abcdefg5a4317ae22924fc1c91669
client   | 2025-07-08T05:42:53.397Z | INFO  | Successfully joined meeting: 12rg1/3FSzihG3R0yOjb4A==
client   | 2025-07-08T05:42:53.397Z | DEBUG | Starting polling with interval: 0ms
Received 960 bytes of audio data at 1751953373930 from Dev Eloper
Received 640 bytes of audio data at 1751953373952 from Dev Eloper
Received 640 bytes of audio data at 1751953373973 from Dev Eloper
Received 640 bytes of audio data at 1751953373994 from Dev Eloper
Received 640 bytes of audio data at 1751953374015 from Dev Eloper
Received 640 bytes of audio data at 1751953374036 from Dev Eloper
Received 640 bytes of audio data at 1751953374057 from Dev Eloper
webhook  | 2025-07-08T05:43:00.432Z | DEBUG | Received webhook request: /
webhook  | 2025-07-08T05:43:00.432Z | INFO  | Received event: meeting.rtms_stopped
client   | 2025-07-08T05:43:00.432Z | INFO  | Leaving meeting: 12rg1/3FSzihG3R0yOjb4A==
client   | 2025-07-08T05:43:00.432Z | DEBUG | Stopping polling
client   | 2025-07-08T05:43:00.432Z | INFO  | Successfully left meeting