Build a video conferencing app with the Zoom Video SDK
- Update: March 4, 2024
The blog has been updated to reflect the latest changes in the Zoom Video SDK, it uses the new approach to render video introduced inv1.10.7of the SDK.
The Zoom Video SDK lets you add real-time audio and video to your application easily, backed by the powerful Zoom technology users love. Let's look at how to integrate the Zoom Video SDK into your website, by building a simple video conferencing application.
Prerequisites:
- Node (v18+) & NPM (v10+)
- A Zoom Video SDK Account
Step 1: Scaffold the application
To scaffold our application we'll be using Vite. Open a terminal and execute:
npm create vite zoom-video-sdk -- --template vanilla
This will create a new folder called zoom-video-sdk with the following structure:
.
├── counter.js # we can delete this
├── index.html # our markup goes here
├── javascript.svg
├── main.js # we'll write our code here
├── package.json
├── public
│   └── vite.svg
└── style.css
We'll write all our markup in the index.html file, and all our code in the main.js file.
Step 2: Configuring the project
Install the dependencies
We will install the Zoom Video SDK and jsrsasign, a library to generate JWTs. You can use the following command for installation:
npm install @zoom/videosdk jsrsasign
Enable Shared Array Buffers
To leverage the full power of the Zoom Video SDK we need to enable support for Shared Array Buffers (SAB). Simply, download this file and place it in the public folder of your project as public/coi-serviceworker.js. Later we'll import this file in our index.html file and this will enable SAB support using a service worker. You can read more about SAB from our documentation or this blog post from one of our other Developer Advocates.
Add Environment Variables
To complete the setup, let's create a .env file in the root of our project and add the Zoom Video SDK Key and Secret to it. You can find your SDK Key and Secret in the Video SDK Dashboard, by clicking on the Develop button and selecting Build Video SDK.
VITE_SDK_KEY="Your Zoom SDK Key"
VITE_SDK_SECRET="Your Zoom SDK Secret"
Notice we prefix the variables with VITE_, this lets us access these variables in our main.js file. That's it, we're ready to write some code!
Step 3: Markup for the application
Let's start by adding some markup to our index.html file. We'll add a <video-player-container> element for user videos, buttons to start and end the session, and another button to toggle the local user's video on and off.
<html lang="en">
    <body>
        <h1 class="headline">Zoom VideoSDK Hello World</h1>
        <video-player-container></video-player-container>
        <script src="/coi-serviceworker.js"></script>
        <script type="module" src="/main.js"></script>
    </body>
</html>
Notice at the end we import the coi-serviceworker.js file and our main.js file.
Step 4: Initialize the SDK
In the main.js file let's import the Zoom Video SDK and our styles. We'll also import generateSignature function to generate JWTs that we'll define later.
import ZoomVideo, { VideoQuality } from "@zoom/videosdk";
import "./style.css";
import { generateSignature } from "./utils";
Next, we'll define a few variables:
const sdkKey = import.meta.env.VITE_SDK_KEY;
const sdkSecret = import.meta.env.VITE_SDK_SECRET;
const videoContainer = document.querySelector("video-player-container");
const topic = "SomeTopicName";
const role = 1;
const username = `User-${new Date().getTime().toString().slice(6)}`;
The sdkKey and sdkSecret variables are read from the .env file we created earlier.
The videoContainer variable is used to store the reference to the DOM element we created in the markup.
The topic, role, and username variables are used to create a video session, topic can be any string that users can join, role can be either 1 or 0, 1 is for the host and 0 is for the participant, and username is the name of the user joining the session.
const client = ZoomVideo.createClient();
await client.init("en-US", "Global", { patchJsMedia: true });
We create a new Zoom Video SDK client and initialize it. You can read more about the different options within the init function here.
Step 5: Start a session
Let's create a function startCall that will join a session and start the audio and video.
const startCall = async () => {
  const token = generateSignature(topic, role, sdkKey, sdkSecret);
  ...
};
Zooms uses JWTs to authorize users, we'll use the generateSignature function to generate a JWT. You can read more about JWTs here. We'll go over the generateSignature function in the last section.
As we move on, I'll omit the code we've gone over to keep the snippet concise.
We'll add an event listener to the peer-video-state-change event. This event is fired when a user joins or leaves the session. We'll call the renderVideo function when this event is fired to keep our video layout up to date.
const startCall = async () => {
  ...
  client.on("peer-video-state-change", renderVideo);
  ...
};
Next, we can join the session using the join function and pass in our topic, JWT token and username from before.
const startCall = async () => {
  ...
  await client.join(topic, token, username);
  ...
};
Now we can access the mediaStream using the getMediaStream function and start the audio and video.
const startCall = async () => {
  ...
  const mediaStream = client.getMediaStream();
  await mediaStream.startAudio();
  await mediaStream.startVideo();
  ...
};
Once all the media streams have started, we can render the videos to a canvas element using the renderVideo function:
const startCall = async () => {
  ...
  await renderVideo({ action: 'Start', userId: client.getCurrentUserInfo().userId });
};
Step 6: Render the videos
With the Zoom Video SDK, you can render video either using stream.attachVideo and stream.detachVideo methods which give you access to VideoPlayer elements that you can nest in your DOM and style with CSS. Or you can use stream.renderVideo method that takes in a single canvas element and the coordinates of each tile to render them on the canvas. We'll use the attachVideo and detachVideo methods as they're easier to style by writing simple CSS.
The renderVideo function will accept an event object of type event: { action: "Start" | "Stop"; userId: number; }. We're keeping the function signature the same as the peer-video-state-change event so that we can reuse the function.
const renderVideo = async (event) => {
  ...
};
We can access the media stream using the getMediaStream function on the client. If the action is Start, we'll call the attachVideo function with the userId and the desired video quality. This method attaches the video stream to a VideoPlayer element, we'll add this element to the DOM as a child of the videoContainer.
const renderVideo = async (event) => {
  const mediaStream = client.getMediaStream();
  if (event.action === 'Start') {
    const userVideo = await mediaStream.attachVideo(event.userId, VideoQuality.Video_360P);
    videoContainer.appendChild(userVideo);
  }
  ...
};
If the event action is Stop we can call the detachVideo function to stop rendering the video for the user. This method returns an element (or array of elements) that we'll remove from the DOM.
const renderVideo = async (event) => {
  ...
  else {
    const element = await mediaStream.detachVideo(event.userId);
    Array.isArray(element) ? element.forEach((el) => el.remove()) : element.remove();
  }
};
Step 7: Toggle the user video
We can define a toggleVideo function that will toggle the user's video on and off. We'll call the startVideo and stopVideo functions on the mediaStream object to start and stop the video respectively. We'll also call the renderVideo function to update the video layout for the local user.
const toggleVideo = async () => {
    const mediaStream = client.getMediaStream();
    if (mediaStream.isCapturingVideo()) {
        await mediaStream.stopVideo();
        await renderVideo({
            action: "Stop",
            userId: client.getCurrentUserInfo().userId,
        });
    } else {
        await mediaStream.startVideo();
        await renderVideo({
            action: "Start",
            userId: client.getCurrentUserInfo().userId,
        });
    }
};
Step 8: End the session
We can define an endCall function that will end the session. First, we remove the peer-video-state-change event listener. Then we can clean up the displayed videos by calling the detachVideo function for each user and removing the elements from the DOM. Finally, we'll call the leave function on the client to leave the session and stop the audio and video.
const leaveCall = async () => {
    client.off("peer-video-state-change", renderVideo);
    const mediaStream = client.getMediaStream();
    for (const user of client.getAllUser()) {
        const element = await mediaStream.detachVideo(user.userId);
        Array.isArray(element)
            ? element.forEach((el) => el.remove())
            : element.remove();
    }
    await client.leave();
};
Step 9: Wire it all up
We can now wire up all the functions we defined earlier to the buttons in our markup. We can reference the buttons using their ids like so:
const startBtn = document.querySelector("#start-btn");
const stopBtn = document.querySelector("#stop-btn");
const toggleVideoBtn = document.querySelector("#toggle-video-btn");
When the start button is clicked, we'll call the startCall function and update the button text and visibility. We'll also disable the button to prevent multiple clicks.
startBtn.addEventListener("click", async () => {
    startBtn.innerHTML = "Connecting...";
    startBtn.disabled = true;
    await startCall();
    startBtn.innerHTML = "Connected";
    startBtn.style.display = "none";
    stopBtn.style.display = "block";
    toggleVideoBtn.style.display = "block";
});
When the stop button is clicked, we'll call the leaveCall function and update the button text and visibility. We'll clean up the DOM by removing the canvas element and adding a new one.
stopBtn.addEventListener("click", async () => {
    toggleVideoBtn.style.display = "none";
    await leaveCall();
    stopBtn.style.display = "none";
    startBtn.style.display = "block";
    startBtn.innerHTML = "Join";
    startBtn.disabled = false;
});
When the toggle video button is clicked, we'll call the toggleVideo function.
toggleVideoBtn.addEventListener("click", async () => {
    await toggleVideo();
});
Step 10: Helper functions
We'll define a few helper functions that we used earlier in a utils.js file. We'll import the jsrsasign library to generate JWTs, and the vidHeight and vidWidth variables from our main.js file.
import KJUR from "jsrsasign";
import { vidHeight, vidWidth } from "./main";
generateSignature
The Video SDK uses JSON Web Tokens (JWTs) for authorizing users. More information on each of those can be found here. The JWT needs:
app_key: your Video SDK Keytpc: the Video SDK Session namerole_type: the user role.1specifies host or co-host, while0specifies participantversion: set to1iat: token issue timestampexp: token expiration timestamp
Here's what an example implementation of the generateSignature function looks like:
export function generateSignature(sessionName, role, sdkKey, sdkSecret) {
    const iat = Math.round(new Date().getTime() / 1000) - 30;
    const exp = iat + 60 * 60 * 2;
    const oHeader = { alg: "HS256", typ: "JWT" };
    const oPayload = {
        app_key: sdkKey,
        tpc: sessionName,
        role_type: role,
        version: 1,
        iat: iat,
        exp: exp,
    };
    const sHeader = JSON.stringify(oHeader);
    const sPayload = JSON.stringify(oPayload);
    const sdkJWT = KJUR.KJUR.jws.JWS.sign(
        "HS256",
        sHeader,
        sPayload,
        sdkSecret,
    );
    return sdkJWT;
}
Disclaimer: In a production use-case, you should always sign your JWT within a backend service. Make sure you don't leak your SDK Secret to the frontend.
Step 11: Add styles
For completeness, here's the style.css file I'm using. Feel free to use your own styles.
body {
    display: flex;
    flex: 1;
    flex-direction: column;
    height: 100vh;
    font-family: "Segoe UI", Tahoma, Geneva, Verdana, sans-serif;
}
.headline {
    font-size: 2.25rem;
    font-weight: 700;
    text-align: center;
    padding: 2rem;
}
.container {
    display: flex;
    flex-direction: row;
    align-self: center;
}
.btn {
    background-color: #3b82f6;
    color: #fff;
    font-weight: 700;
    font-size: large;
    padding: 1rem 2rem;
    border: none;
    border-radius: 0.25rem;
    margin: 0.5rem;
    margin-bottom: 1rem;
    width: 16rem;
    align-self: center;
    cursor: pointer;
}
.hidden {
    display: none;
}
video-player-container {
    margin-left: auto;
    margin-right: auto;
    margin-bottom: 40px;
    width: 80%;
    display: grid !important;
    grid-template-columns: repeat(1, minmax(0, 1fr));
}
video-player-container:has(> :nth-child(2)) {
    grid-template-columns: repeat(2, minmax(0, 1fr));
}
video-player-container:has(> :nth-child(5)) {
    grid-template-columns: repeat(3, minmax(0, 1fr));
}
video-player {
    width: 100%;
    height: auto;
    aspect-ratio: 16/9;
}
Notice how we're using the :has pseudo-class to change the layout of the videos based on the number of users in the session. You can extend the styles to support more users.
Step 12: Run the application
We can now run the application using the following command:
npm run dev
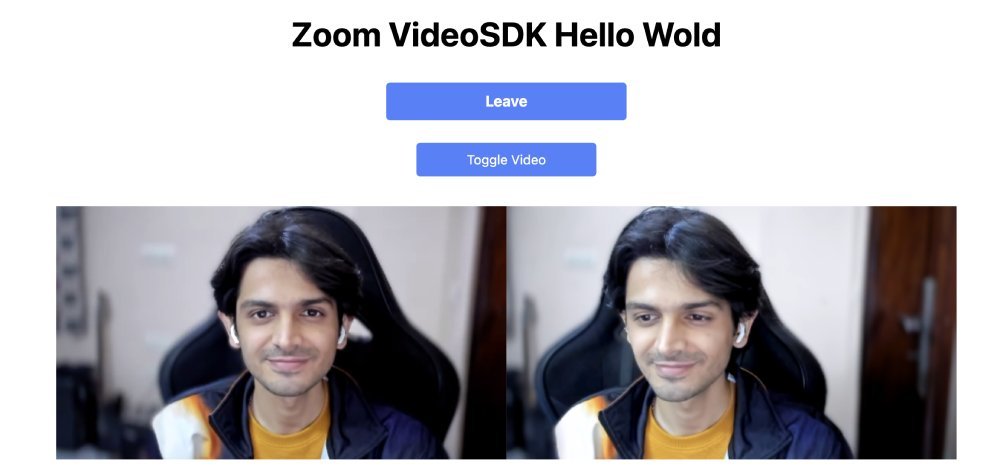
Navigate to http://localhost:5173 in your browser and you should see the Start button. Click on the Start button and you should see the video of the local user. You can open the same URL in another tab or browser and you should see the video of the second user. You can toggle the video on and off using the Toggle Video button. You can end the session by clicking on the Leave button.
Conclusion
At this point we've successfully integrated video and audio into your website. If you want to learn more about the functions we've used in our project, you can find the full API reference here. This is just the beginning of what you can do with the Video SDK! You can build other features like screen sharing, chat, cloud recording, and more. You can find more information under the Add Features section in our Vide SDK docs.