Using Zoom APIs
Zoom APIs enable developers to request information from Zoom, including (but not limited) to user details, meeting reports, dashboard data, as well as perform actions on the Zoom developer platform on a user's behalf. For example, you can create a new user or delete a user's meeting recordings.
In this document, you may see the terms client and app used interchangeably. Both of these terms refer to an app using the Zoom API.
Zoom must authenticate each HTTP request made to the Zoom API. Zoom supports OAuth 2.0.
Using OAuth 2.0
Zoom uses OAuth 2.0 for authentication. This lets applications obtain access to Zoom resources, such as a user's profile information, using the Zoom API.
The following sections provide an overview on the OAuth protocol. To begin using the OAuth protocol for your app's authentication with Zoom, follow the steps in OAuth 2.0 for Zoom.
OAuth roles
The OAuth protocol defines four specific roles. These roles are actively involved in the process of authentication with Zoom APIs:
- Resource Owner - A user in a Zoom account who can either authorize or decline a Client from accessing information related to the user's Zoom account.
- Resource Server - The server that hosts the resource. If your app is integrating with the Zoom API to obtain user-related information, then the Zoom API server is considered the resource server.
- Client - The application that requests access to the user's information. If your app makes access requests to the Zoom API, then your app is considered the Client.
- Zoom Authorization Server - The authorization server issues access tokens to the client after successfully authenticating and obtaining authorization from the resource owner.
What is an access token?
An access token is a credential in the form of a string that represents the authorization granted to the app. For example, like an ID card that identifies a person's level of authority or a driver's license that gives a person permission to drive.
User-authenticated
Generally, the interaction between a Client (your app), a Zoom user, Zoom's authorization server, and the Zoom API follows the flow in the following diagram. This is called the user-authenticated flow as the user has to give access permission to the app.
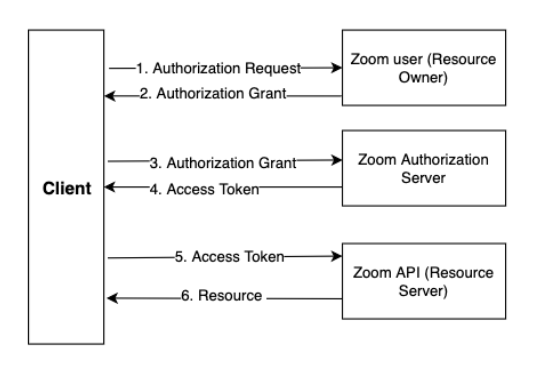
- The Client (your app) requests authorization from the Zoom user to access the user's information.
- The user authorizes the app and the app receives an Authorization Grant.
- The app presents the Authorization Grant to the Zoom Authorization Server to verify that it has received the user's permission to access user information.
- The Zoom Authorization Server acknowledges that user has permitted the app with requested access and it sends an Access Token along with a Refresh Token back to the app. The access token must be used as a means of authentication while making API calls to the Zoom API Server.
- The app calls the Zoom API to access requested resource by including the Access Token in the request as a means of authentication. When an access token expires, it becomes invalid. In this case, the client must use the Refresh Token to request another valid access token.
- After the Zoom API server authenticates the app, it sends back the Requested Resource in the form of a JSON response. If the authentication fails, an error is thrown stating what caused the error.
Server-to-Server authentication
Server-to-server authentication does not require the end user to give permission to the app to access their information. The following diagram shows this flow.

The Server-to-Server OAuth app type skips the end user authorization step as well as the redirect URL and refresh token.
OAuth grant types
An Authorization Grant is the authorization assigned to the Client by the resource owner. The grant type refers to the method the Client uses to request authorization.
Zoom supports the standard authorization_code, device_code, and refresh_token grant types. See OAuth 2.0 for Zoom for details.
Zoom also created the account_credentials grant type for server-to-server OAuth app types. See Internal apps (server-to-server) - Use account credentials to get an access token to learn more.
Authorization Code
The following steps provide an overview of the Authorization Code grant flow:
-
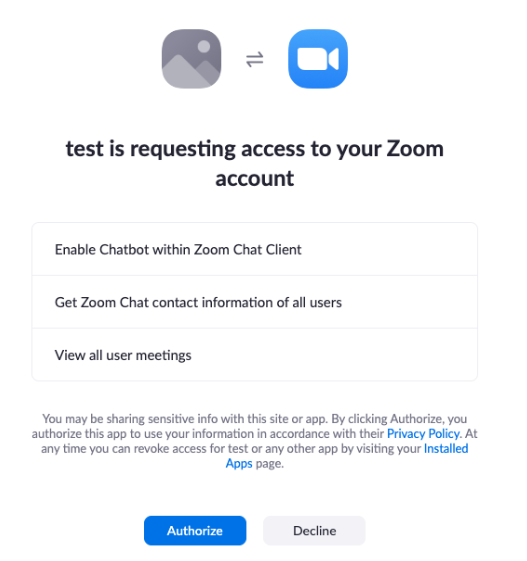
The Client directs the user to the Zoom authorization server. The user will see a dialog box with permission request for access. This process is provisioned by Zoom via the Authorization URL. When a user tries to add your app, the user is directed to the Zoom API authorization endpoint. To test it with your app locally, copy the Testable URL of your app and open it in a browser. A page similar to the one shown in the image below appears:
-
The user clicks Authorize.
-
The user is redirected to the app's
redirect_urlalong with an Authorization Code in the query string. The URL with the Authorization Code resembles following URL:https://yourappsredirecturl/?code={theauthorizationcode} -
The Client makes a request to Zoom to exchange the Authorization Code for an access token.
Example Node.js request access token with Authorization Code
var request = require("request");
var options = {
    method: "POST",
    url: "https://zoom.us/oauth/token",
    qs: {
        grant_type: "authorization_code",
        //The code below is a sample Authorization Code. Replace it with your actual Authorization Code while making requests.
        code: "B1234558uQ",
        //The uri below is a sample redirect_uri. Replace it with your actual redirect_uri while making requests.
        redirect_uri: "https://abcd.example.com",
    },
    headers: {
        /**The credential below is a sample base64 encoded credential. Replace it with "Authorization: 'Basic ' + Buffer.from(your_app_client_id + ':' + your_app_client_secret).toString('base64')"
         **/
        Authorization: "Basic abcdsdkjfesjfg",
    },
};
request(options, function (error, response, body) {
    if (error) throw new Error(error);
    console.log(body);
});
Using JWT
A JSON Web Token (JWT) lets you to create tokens that provide secure data transmission using a compact JSON object. JWTs contain a signed payload that helps establish server-to-server authentication. See JWT.io to learn more.
API requests
Global base API URL:
https://api.zoom.us/v2/
All API requests must be made over HTTPS. The https://api.zoom.us/v2/ URL is the default request base URL. This includes the API version, /v2, in the path.
The complete API request URL varies depending on the accessed resource. For example, to get a user's details in your app, you must make an GET request to the Get a user API at the https://api.zoom.us/v2/users/{userId} URL, where {userId} is the user's ID or email address. If your app is registered in the Zoom App Marketplace as an account-level OAuth app, your app must have the user:read:admin scope in order to use this API.
Regional base URLs
The api_url in the access token response indicates the region serving that user so you can directly send API requests to that region. Currently we expose the following regions.
| Region Name | Region | API URL |
|---|---|---|
| Australia | AU | https://api-au.zoom.us |
| Canada | CA | https://api-ca.zoom.us |
| European Union | EU | https://api-eu.zoom.us |
| India | IN | https://api-in.zoom.us |
| Saudi Arabia | SA | https://api-sa.zoom.us |
| Singapore | SG | https://api-sg.zoom.us |
| UK | UK | https://api-uk.zoom.us |
| US | US | https://api-us.zoom.us |
| Vanity account | N/A | https://{vanity}.zoom.us |
You can use the api_url to create a regional base URL to send requests. Be sure to also include the version in the path, for example /v2/.
For example, you can use the base URL https://api-eu.zoom.us/v2/ to send API requests directly to the EU region if it was returned in the api_url field. However, regardless of the api_url value, you can continue to use the global region at https://api.zoom.us all requests.
The global API URL is the default: https://api.zoom.us.
Example API requests
Example Node.js API request with the user ID for Account-level apps
var request = require("request");
var options = {
    method: "GET",
    // A non-existing sample userId is used in the example below.
    url: "https://api.zoom.us/v2/users/sjkf1234",
    headers: {
        authorization: "Bearer {yourtokenhere}", // Do not publish or share your token publicly.
    },
};
request(options, function (error, response, body) {
    if (error) throw new Error(error);
    console.log(body);
});
Example Node.js API request with the user ID for User-level apps
var request = require("request");
var options = {
    method: "GET",
    // Use the `me` keyword for the request below.
    url: "https://api.zoom.us/v2/users/me",
    headers: {
        authorization: "Bearer {yourtokenhere}", // Do not publish or share your token with anyone.
    },
};
request(options, function (error, response, body) {
    if (error) throw new Error(error);
    console.log(body);
});
Requests for JWT apps
You do not need scopes for JWT apps. Your JWT app will only have access to your Zoom account's information. To view a specific user's information, you must provide the user's userId or email address as the {userId} value in the API path. You can also use the me keyword instead of the userId value.
Requests for OAuth apps
To get information about a user with a user-level OAuth app, the app must have the user:read scope. While the URL for the request is the same, the behavior of userId value is different from an account-level apps. Instead of providing a user's userId or email address, you must use the me keyword as the value of the userId path parameter. Otherwise, your app will receive an invalid token error.
Requests for Server-to-Server OAuth apps
Server-to-Server OAuth apps also use scopes. You wouldn't use the me keyword with this app type; you must provide a userId or email address. See Server-to-Server authentication for details.
How to get your account ID
If you need your accountId (for example, to use it in an application or a different API call), you can get it from the Get a user endpoint. The account_id field in the response contains this value.
The me keyword
You can use the me keyword in place of the userId and the accountId keyword in any supported API call. When you use the me keyword, the API call uses the authenticated user's access token.
For example, to use the API to update a user's settings as the authenticated user, you would call the API with the /users/me/settings path, not the /users/{userId}/settings path. To get account settings, you can use /accounts/me/settings.
Shared access permissions
Some users may have permissions to access (create, read, update, or delete) information associated with other users on Zoom accounts. For example, the Schedule Privilege enables users to assign other users on their account to schedule meetings on their behalf. A user that has been granted this privilege has access to schedule meetings for the other user. A user may also have a role that grants them access to other user information.
With shared access permissions, a user can choose whether your app can access the following information:
- Only information associated with them as the user that added the app (including others involved in that information, for example, a calendar invitation), or
- Both the information associated with them and the others that user is allowed to access (again, along with the others included in that information, such as a calendar invitation).
Item 2 refers to when a user authorizes your app to use their "shared access permissions" after they add or manage your app on their account. In the example above, the user can choose to share access permissions to schedule meetings for another user's account with your app. See Allowing Apps access to shared access permissions for details on the end user experience.
Handling errors for shared access permissions
Your app does not need to do anything different for this access. Zoom handles this via the Authorization server.
The users that added your app can continue using your app to access their associated information without the need to take any action. If your app does not access or change information associated with a user other than the user who added it, then you should not receive additional errors.
Your app will receive an error if your app attempts to access or change information for a user other than the one who added the app and when the user who added the app:
- Is not authorized to access or change the other user's information, or
- Has not authorized your app to use shared access permissions.
In this case, your app will receive a 403 response with an "authenticated user has not permitted access to the targeted resource" error. This will occur after a request to any API, such as:
/v2/meetings/{meetingId}/**/v2/users/{userId}/**/v2/webinars/{webinarId}/**/v2/**/recordings//v2/phone/**(user-level)
Currently, there is no way for your app to know whether a user has authorized shared access permissions for your app. You may be able to determine whether a user should have shared permissions based on the context. For example, your app lets users schedule meetings. In this case, when your app receives the error, you can point the user to the Allowing Apps access to shared access permissions Zoom Help Center article that describes how the user can authorize shared permissions for the app.
Once the user authorizes your app with shared permissions, the API will return the expected response.
Apps with high API failure rates
If any single app has a high error-to-request ratio, Zoom may disable your app. Your apps must handle requests and errors gracefully. If your app was disabled because of a high failure rate or high error-to-request ratio, contact Support or reach out on the Developer Forum for help.
Email address display rules
Zoom displays email addresses for users external to your account only if they meet any of the conditions below:
- If the participant entered their email address into the meeting or webinar registration flow, then it will be shown for that specific meeting or webinar.
- If the host provided the participant's email to Zoom in the following ways:
- If the participant is on the calendar invitation or event using one of Zoom's calendar integrations (Outlook or Google Calendar).
- If the participant has externally authenticated using an authentication system provided by the host.
- If the participant email was entered with the "Allow authentication exception" option under "Only authenticated users can join..."
- If the participant's email was entered using the Breakout Rooms assignment feature or "Allow authentication exception" to Breakout Rooms feature.
- If you import a CSV file for panelists and attendees of a webinar.
For more information, read the "Zoom API email address display rules" Changelog post.
Understanding Personal Meeting ID (PMI)
You can start instant meetings and schedule meetings with your Personal Meeting ID (PMI). See the Zoom Support articles, Using Personal Meeting ID (PMI) and Personal meeting ID (PMI) and personal link, for details.
When Zoom creates a meeting using your PMI, it creates a unique meeting ID that you can see in the create meeting response. However, Webhooks events will still show your PMI. You should also use your PMI to pass into endpoints, such as:
Meeting ID and UUID
- A meeting ID is a system-generated identifier of an instant or scheduled Zoom meeting. It is unique to the created meeting.
- A UUID is specific to the particular instance of a meeting.
If you have a recurring meeting for example, a UUID is generated for each occurrence. While a meeting ID may expire 30 days after the last time it is used, a UUID does not.
Double-encoding
When you see a note in the API that asks you to double encode a value, for example, a Meeting UUID that begins with a '/'or contains '//', it means you should encode the data twice in a row using the same encoding scheme. You can use various methods to do this, including free resources such as the URL encoder site.
Time in Zoom API
Zoom API supports the ISO 8601 date and time format as well as local time. Some APIs only support UTC time. See the format shown below in the API reference doc for the supported format.
yyyy-MM-ddTHH:mm:ssZ   UTC
yyyy-MM-ddTHH:mm:ss    Local time
For example, if the parameter shows that it accepts the date and time in yyyy-MM-ddTHH:mm:ssZ format, this indicates UTC time.
Download URL
You can download recordings and other assets from Zoom using the download_url (the URL to download the recording) in API responses and event notifications such as webhooks. Zoom dynamically generates the download_url for each request.
If a user has authorized and installed your OAuth app that contains recording scopes, use the download_access_token or the user's OAuth access token* to download the file. Set the token as a Bearer token in the Authorization header. For example:
curl -H 'Authorization: Bearer <ACCESS_TOKEN>' https://{{base-domain}}/rec/archive/download/xyz
*For Video SDK use your Video SDK API JWT.
Redirects
The download_url may also be a redirect. In that case, be sure to follow redirects. For example, use the curl --location option or another tool like Postman.