Add calling capabilities to your React app with Zoom Phone Smart Embed
In today's fast-paced business communication, every second counts. Support agents handle customer calls, sales teams identify leads, and remote teams collaborate—all relying on seamless calling experiences. Many businesses utilize CRMs and other web applications to manage these interactions and constantly switching between tools can slow things down. That’s where Zoom Phone Smart Embed comes in.
Smart Embed enables developers to integrate Zoom Phone capabilities directly into CRMs and other web applications, allowing users to make and receive calls without leaving their workflow. This enhances efficiency and productivity
In Part 1 of this series, we’ll walk through the step-by-step process of embedding and configuring Smart Embed within a simple React application.
Prerequisites
- Node.js (LTS and NPM recommended)
- A Zoom Phone license
Step 1: Create a new React project
To begin setting up our React app, we will use Vite as our build tool. Simply run the following command and proceed with the prompts in your command line:
npm create vite@latest zoom-phone-smart-embed --template react
cd zoom-phone-smart-embed
Step 2: Configuring the project
Install the dependencies
Once in your working directory, run the following command:
npm install
If needed, install any additional dependencies. However, this guide specifically focuses on SDK implementation without requiring any extra dependencies.
Step 3: Create a SmartEmbed component
After setting up your React project, you will need to create a SmartEmbed component that handles the loading of Zoom Phone SDK and embeds the widget within your application.
The widget can be embedded using either an Iframe or a Script, requiring just a single line of code. In this guide, we will focus on the script embedding method.
Now, in your src directory, create a new folder named "components" where we will store our components as we proceed.
Next, create a new file called SmartEmbed.jsx and add the following code:
import { useEffect, useState } from "react";
import { sendConfigMessage } from "../services/smartEmbedService";
const useSmartEmbed = () => {
    // State to track whether the iframe has loaded
    const [isIframeLoaded, setIsIframeLoaded] = useState(false);
    useEffect(() => {
        // Create a script element to load the Zoom Phone Smart Embed SDK
        const script = document.createElement("script");
        script.src =
            "https://vaapplicationscontent.zoom.us/phoneSdk/static/smart-embed/js/sdk.js";
        script.async = true; // Load asynchronously to avoid blocking
        script.onload = () => {
            console.log("Zoom Phone Smart Embed SDK loaded");
            // Delay the configuration message to ensure SDK is fully initialized
            setTimeout(() => {
                sendConfigMessage(); // Send configuration to the embedded Zoom Phone
                setIsIframeLoaded(true); // Update state to indicate iframe is loaded
            }, 3000);
        };
        // Append the script to the document body
        document.body.appendChild(script);
        // Event listener to handle messages from the Zoom Phone iframe
        const handleZoomPhoneEvents = (event) => {
            // Ensure the event is coming from the expected Zoom domain
            if (event.origin !== "https://applications.zoom.us") return;
            const { type, data } = event.data;
            console.log(`Event Type: ${type}`, data); // Log received event data
        };
        window.addEventListener("message", handleZoomPhoneEvents);
        return () => {
            // Cleanup: Remove the script when the component unmounts
            document.body.removeChild(script);
            // Cleanup: Remove the event listener to prevent memory leaks
            window.removeEventListener("message", handleZoomPhoneEvents);
        };
    }, []);
    return isIframeLoaded; // Return iframe loaded state for use in components
};
export default useSmartEmbed;
In the previous code snippet, we are loading the script into our state while simultaneously listening to zoom events, which will trigger whenever an action occurs in our application.
Step 4: Create a smartEmbedService file
Navigate back to the src directory and create a new folder named "services". Within this folder, create a file and name it smartEmbedService.js, which will be used to implement event-driven APIs in our application.
We are going to start with a fundamental API to initialize the widget into our application. Add the following code to your file:
export const sendConfigMessage = () => {
    const iframe = document.querySelector("#zoom-embeddable-phone-iframe");
    // Ensure the iframe and its contentWindow are available
    if (iframe && iframe.contentWindow) {
        // Construct the message
        iframe.contentWindow.postMessage(
            {
                type: "zp-init-config",
                data: {
                    enableSavingLog: false,
                    enableAutoLog: false,
                    enableContactSearching: false,
                    enableContactMatching: false,
                    notePageConfiguration: {},
                    disableInactiveTabCallEvent: true,
                },
            },
            "https://applications.zoom.us",
        );
        console.log("Sent zp-init-config message");
    } else {
        console.warn("iframe not ready for zp-init-config");
    }
};
At this point, the src directory structure should look like this:
├── src/
│   ├── assets/
│   ├── components/
│   │   ├── SmartEmbed.js   # Smart Embed component
│   ├── services/
│   │   ├── smartEmbedServices.js  # Smart Embed-related service functions
│   ├── App.css
│   ├── App.jsx
│   ├── main.jsx
│   ├── index.css
Step 5: Integrate your SmartEmbed component into your App
Modify your App.jsx to include the SmartEmbed component.
import './App.css'
import SmartEmbed from './components/SmartEmbed'
function App() {
  return (
      <h2>Zoom Phone Smart Embed</h2>
        <SmartEmbed />
  )
}
export default App
NOTE: Before running your app, navigate to the main.jsx file and remove the StrictMode tags from your file to prevent the phone widget from rendering twice.
Step 6: Run and expose your app to a secure tunnel
Once you have your app up and running locally, you need to expose it to the internet securely. You can use a tunneling tool like ngrok. Run the following command:
$ ngrok http 5173
This will generate a secure public URL for your local app on port 5173. Copy the HTTPS URL provided and head back to your app, to the vite.config.js file and add the following lines:
 server: {
    allowedHosts: ['1070-38-99-100-7.ngrok-free.app'],  // your ngrok URL
  }
Step 7: Add your URL to manage domains
Navigate to Zoom Marketplace and add the Zoom Phone Smart Embed app for yourself
Scroll down and click on Configure App, after which you will be prompted to Edit Approved Domains. In this section, add your ngrok https url as a Domain and then Save it. Please remember that under a free ngrok plan, urls are dynamic meaning they change each time you restart the tunnel and will need to be updated under the Edit Approved Domains section. Paid plans offer static domains.
Step 8: Test your app
Visit your https ngrok URL where you will find the login screen for your phone widget, log in and keep the Zoom client running in the background.
Once logged in, you can proceed to dial a number and begin making phone calls using Zoom Phone Smart Embed.
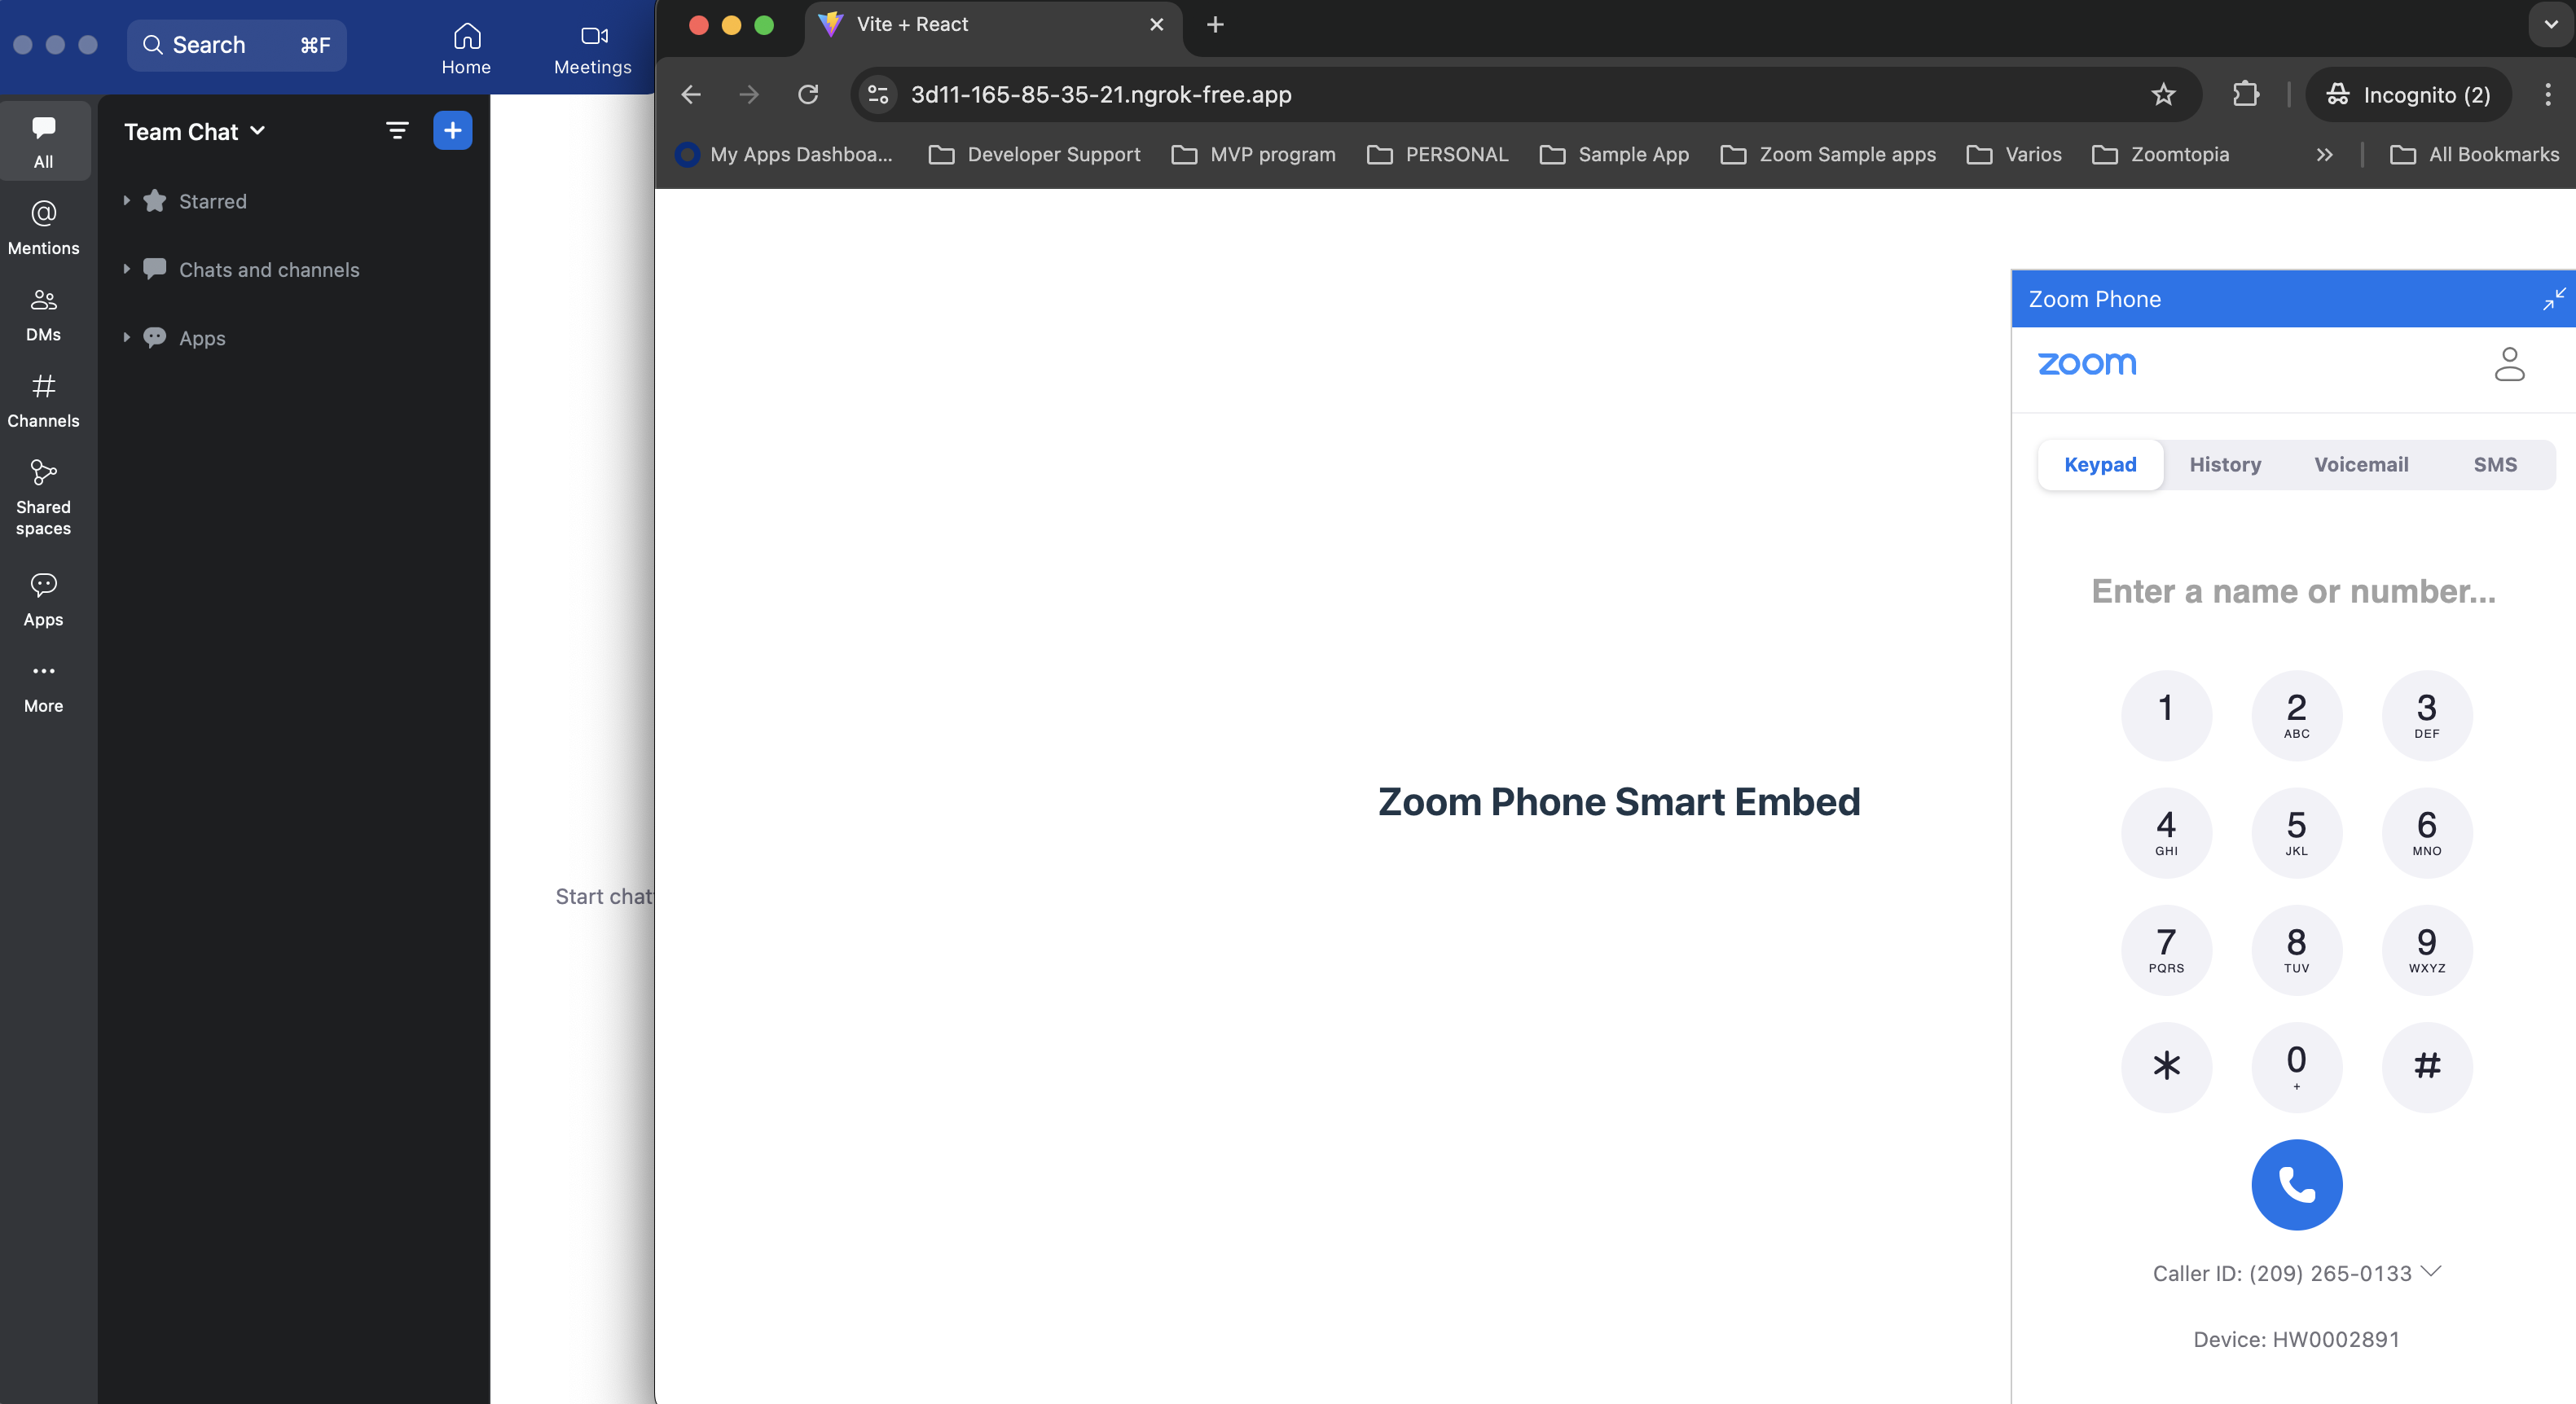
If you have SMS with 10DLC for your conversational messaging enabled in your account, then you will be able to send SMS directly from your app.
What’s next
You’ve now taken the first step in embedding Zoom Phone functionality directly into a React application. In the next part of this guide, we’ll build on this foundation by introducing features like click-to-call handling, improved UI elements, event tracking, and more. These additions will help you create a more responsive, integrated calling experience tailored to your users’ needs. Stay tuned!