Getting started with Zoom Video SDK for iOS - UIKit
- Update: Feb 26, 2026
The blog has been updated to support the latest SPM integration details and a newly added script that helps to generate the JWT token.
Introduction
At Zoom, we strive to provide the best video conferencing experience possible. SDK libraries empower the creation of third party apps powered by our world-class video technology platform. With Zoom Video SDK, developers can build fully-customizable self-branded apps with nearly all of the features of the desktop client Zoom experience, from video calling to screen sharing.
The app lets two or more users have a conversation with each other. Both video and audio-only communication are supported. For this project, we will be using Swift with UIKit. If you're using SwiftUI you can read our SwiftUI blog.
In this blog, we’ll cover:
- Introduction
- Prerequisites
- Getting the SDK and its contents
- Quickstart app contents
- JWT authentication
- Integrating the SDK
- Initializing the SDK
- Joining a session
- Set up delegate callbacks
- Video
- Audio
- Responding to user events
- Leaving a session
You can find the completed project on GitHub.
Prerequisites
To build this app, you should have:
- Xcode
- A physical 64-bit iOS device with iOS version 13.0+
- A Zoom Video SDK account with Video SDK credentials
- A valid provisioning profile certificate
Getting the SDK and its contents
Adding the SDK to your iOS app takes only a single step with Swift Package Manager. In Xcode, select File > Add Package Dependencies.... In the Search or Enter Package URL bar on the top right, enter https://github.com/zoom/zoom-video-sdk-iOS/ and swift-package-manager in the Branch field.
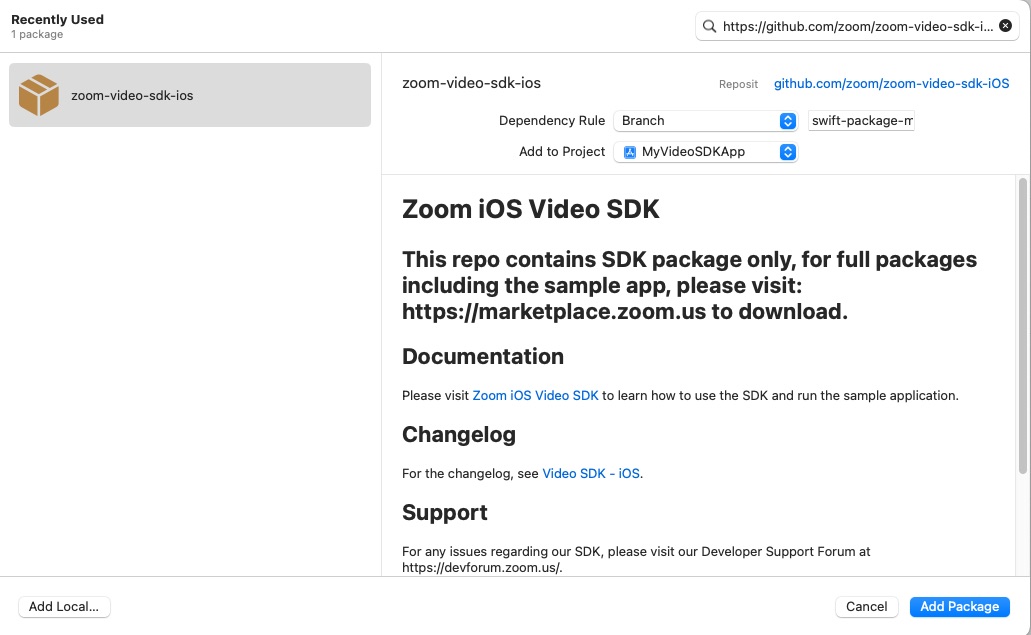
Tap the Add Package button, confirm the app target you are adding it to, and the Video SDK should be added to Package Dependencies accordingly. The Video SDK for iOS package includes the following XCFramework bundles under /Sample-Libs/lib that can be added to your project as needed:
ZoomVideoSDK.xcframeworkandZoomTask.xcframework: Interfaces to support all services related to Zoom sessions, such as initializing the SDK, creating and joining sessions, in-session services, and more.
For this tutorial, we do not need these xcframeworks:
-
CptShare.xcframework: Interfaces to support screen sharing a singleUIView. Required to receive annotation by others when sharing a single UIView, as opposed to full broadcasting. -
zm_annoter_dynamic.xcframework: Interfaces to support the annotation service when sharing. -
ZoomVideoSDKScreenShare.xcframework: Interfaces to support the full screen share service, for broadcasting a device screen. -
zoomcml.xcframework: Interfaces to support virtual background filter and 3D avatar. -
Whiteboard.xcframework: Interfaces to support whiteboard.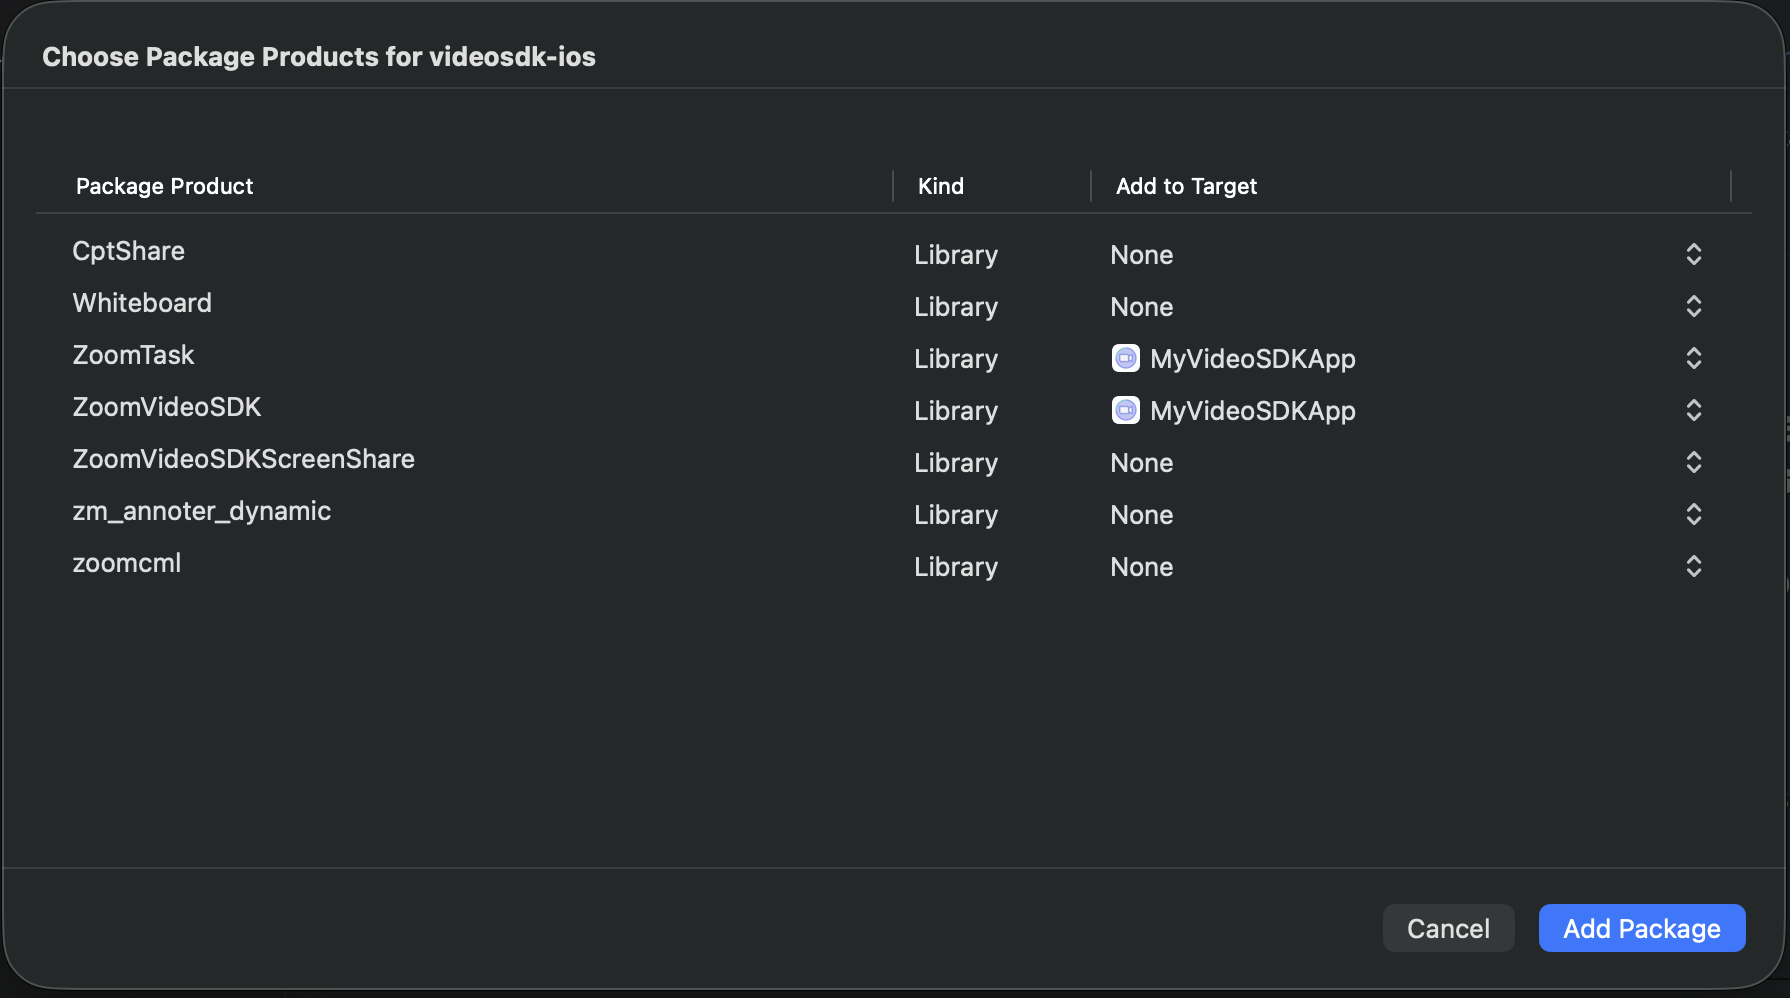
To add framework files manually via the Zoom Marketplace, see the documentation.
Quickstart app contents
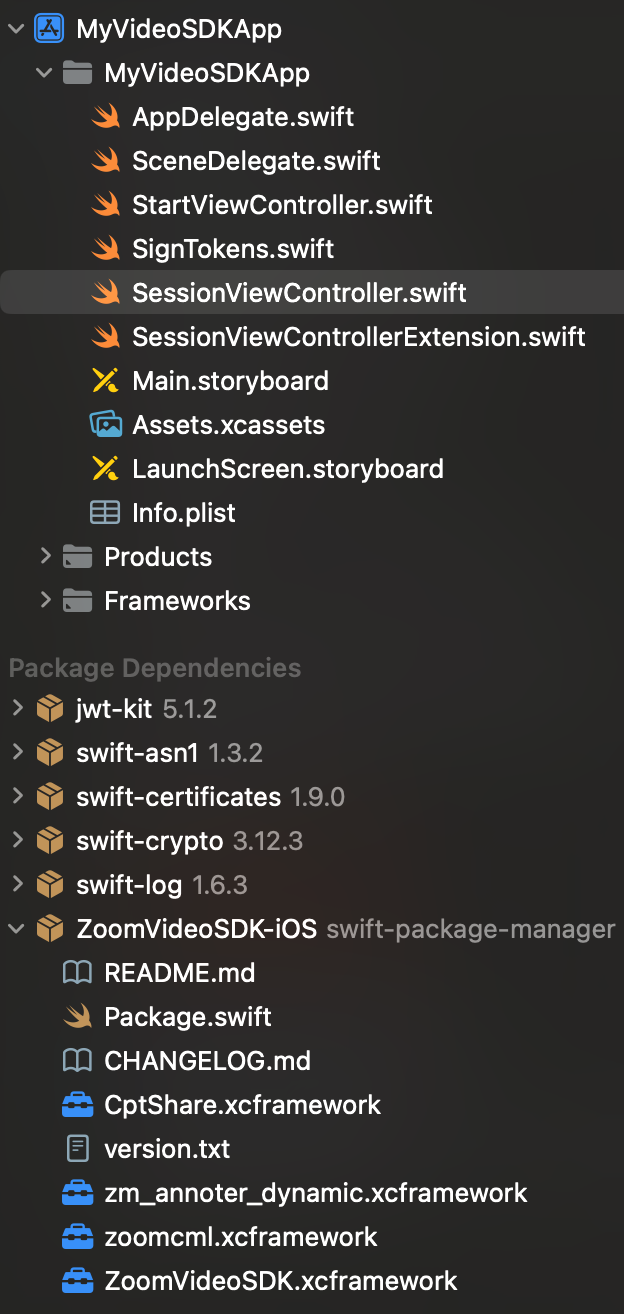
If you’d like to follow along in the quickstart app template, switch to the template branch of the repository and fill in the code at the enumerated comments to create a full-fledged application. MyVideoSDKApp is a simple two-view controller app.
StartViewController is the entry point for the app where the Video SDK is initialized.


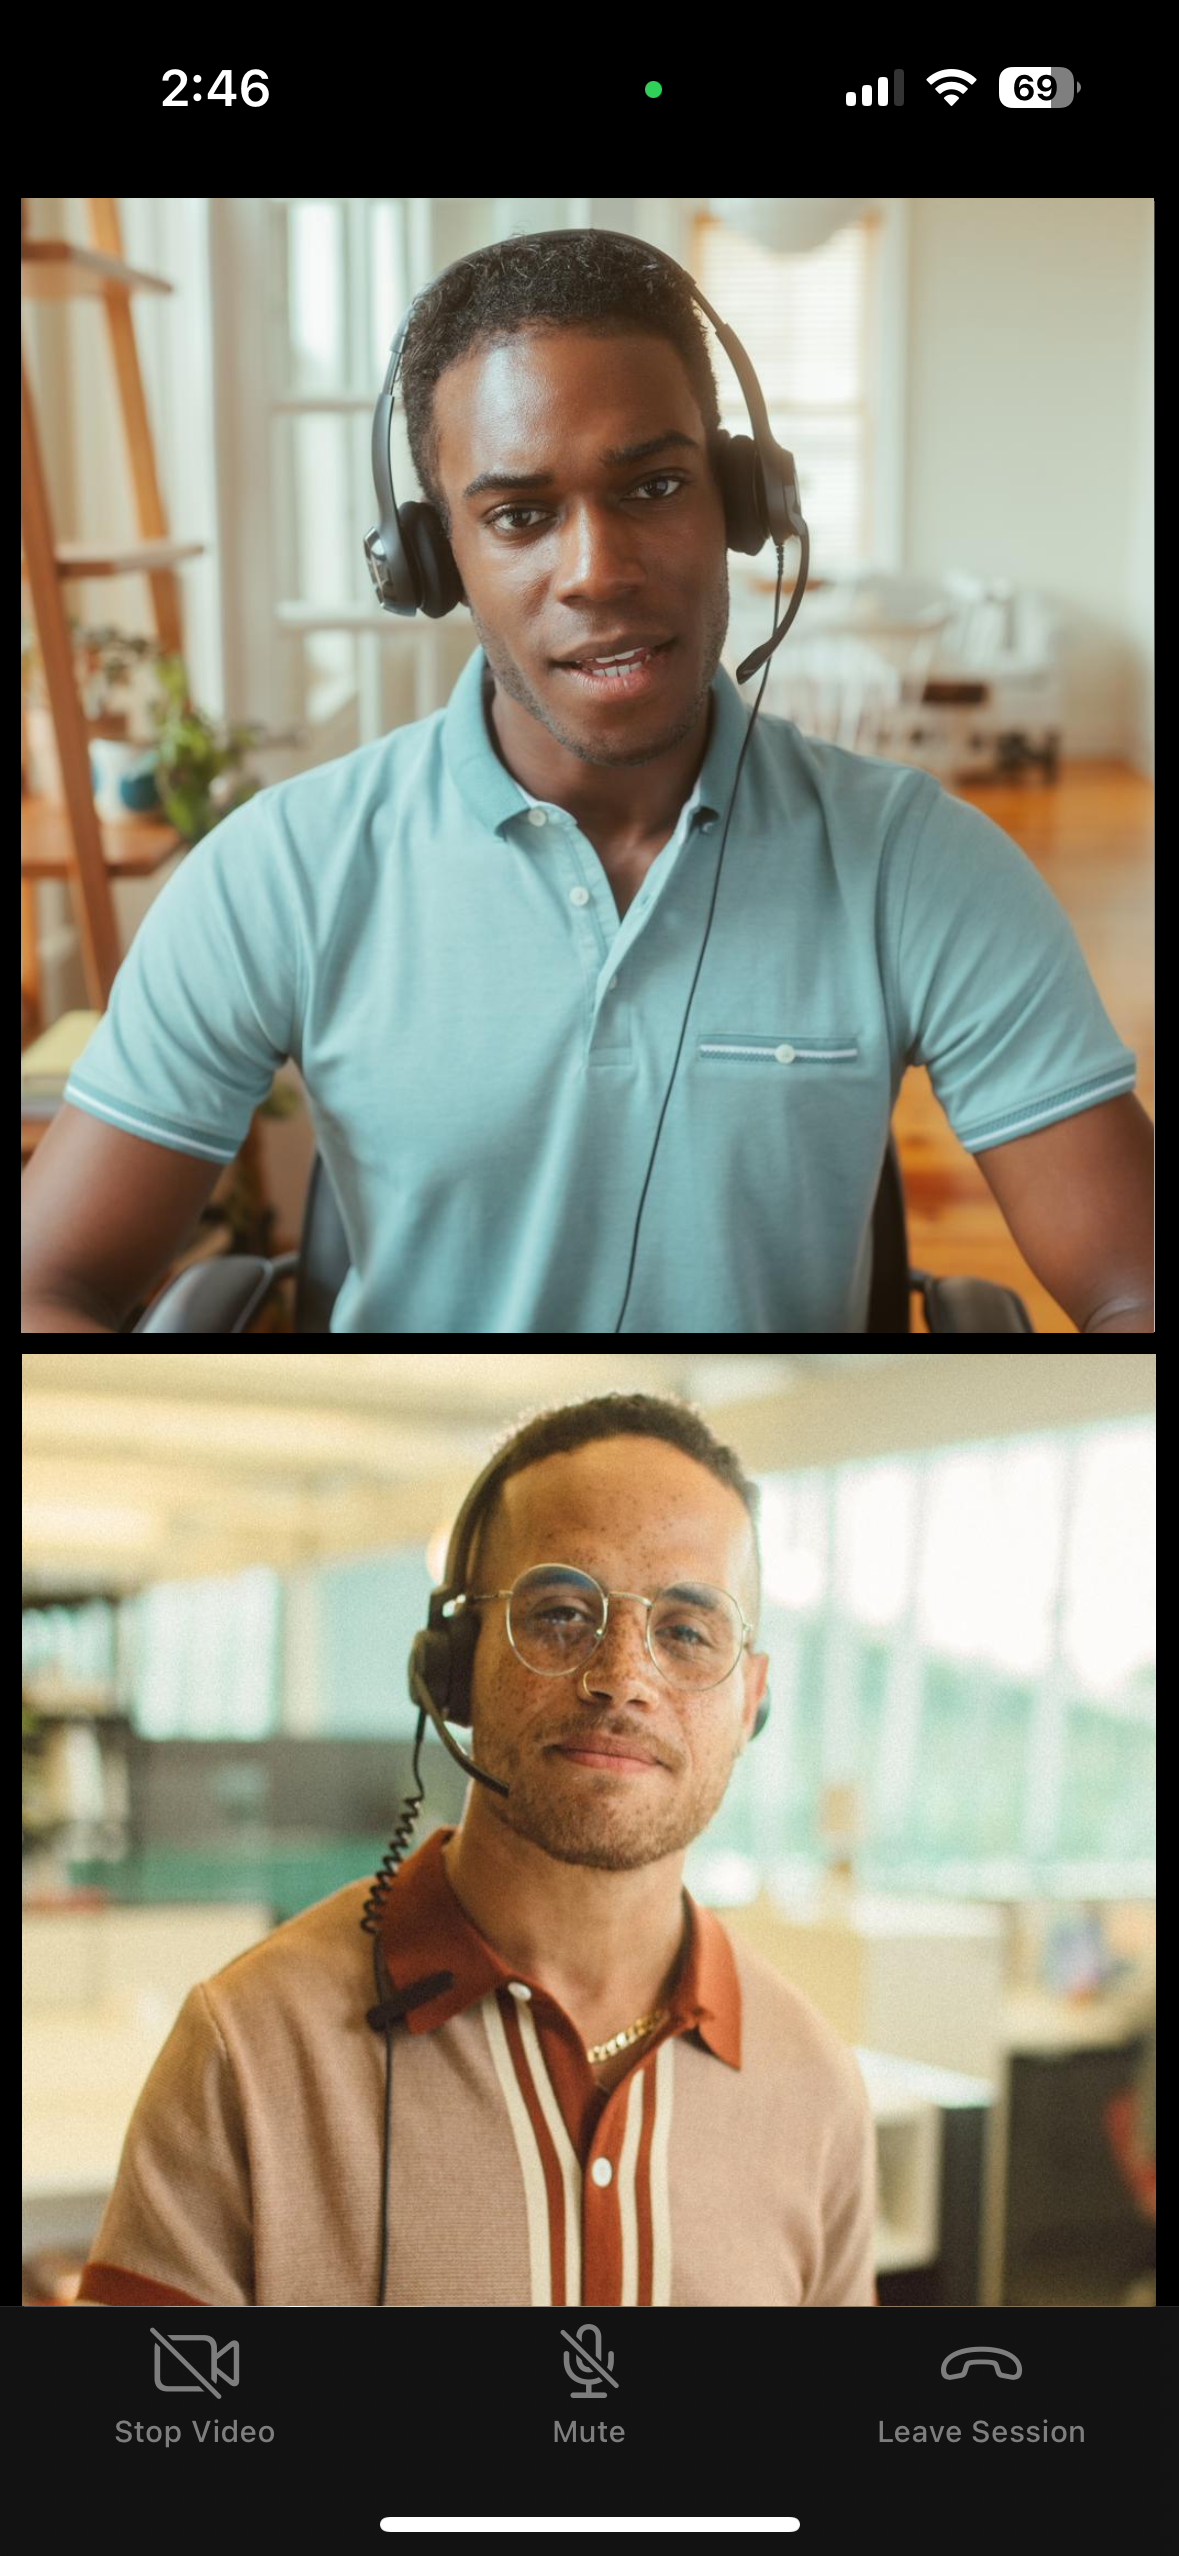
SessionViewController contains a UITabBar which holds the controls for toggling the user’s video, toggling audio and ending the Zoom session. This screen also contains a UIScrollView that contains all the participants in the session.
The three options are tracked in the ControlOption enum.
enum ControlOption: Int {
    case toggleVideo = 0, toggleAudio, endSession
}
JWT authentication
JSON Web Tokens are used to authorize Zoom Video SDK apps. They are always required for starting and joining sessions. Ideally you should be generating the JWT on the server side to ensure safekeeping of your Video SDK credentials. However, as reference, we have added a script in the /Scripts folder using .swift to easily generate the JWT token needed in this demo.
Follow the README in the /Scripts folder to understand how to use the script.
// MARK: Session Information
/*
TODO: Enter the following variables needed to initialize the VSDK and to start/join a session
You should sign your JWT with a backend service in a production use-case. For faster JWT generation, you can navigate checkout the JWTGenerator.swift under Script folder and its README for more details on how to consume it.
Once you got the token, you can simple copy and paste it below.
Ensure that the sessionName matches the session name used to generate the JWT Token.
*/
let jwtToken = "" // Leave this as empty if you choose to copy and paste your generated JWT token directly in the sample app's alert box after clicking on "Join Session"
let sessionName = "" // Also known as tpc in JWT
let userName = "" // Display name
Integrating the SDK
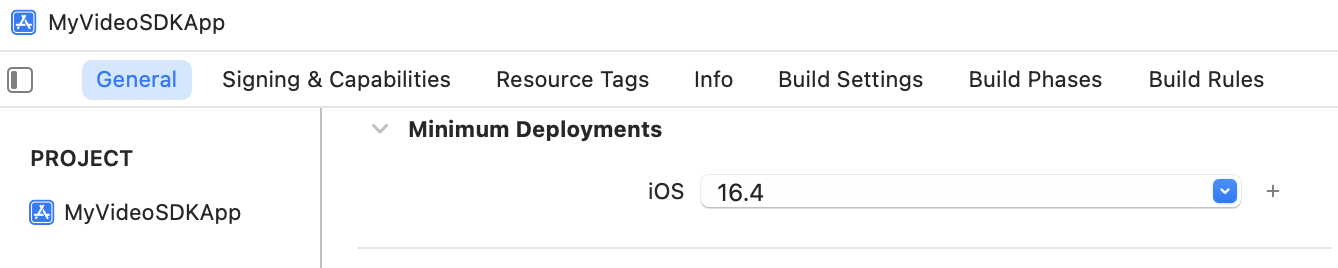
Ensure your app's General > Minimum Deployments target is set to at least iOS 13.0.
If you used Swift Package Manager to add the Zoom Video SDK, your Xcode project's Package Dependencies should look like this:
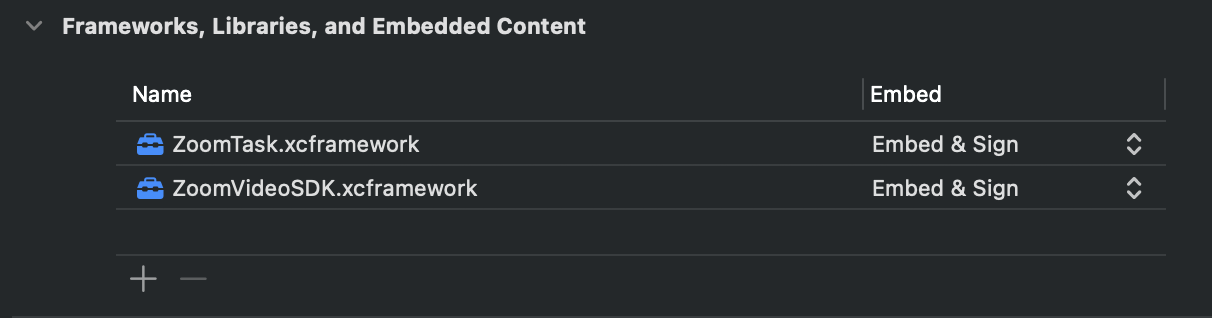
The General > Frameworks, Libraries, and Embedded Content settings should look like this:

If you added the Zoom Video SDK manually, do the following:
In the Video SDK package that was downloaded from the Zoom Marketplace, navigate to /Sample-Libs/lib.
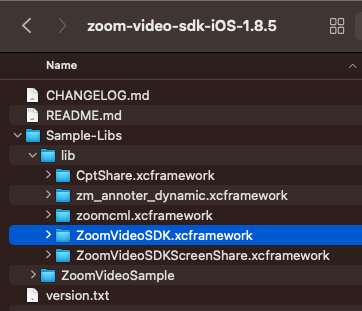
The Video SDK is a dynamic library, so it must be included in the project as an embedded binary. In your Xcode project, navigate to your app's target and then General > Frameworks, Libraries, and Embedded Content and add ZoomVideoSDK.xcframework for the main SDK interfaces and set to Embed & Sign.
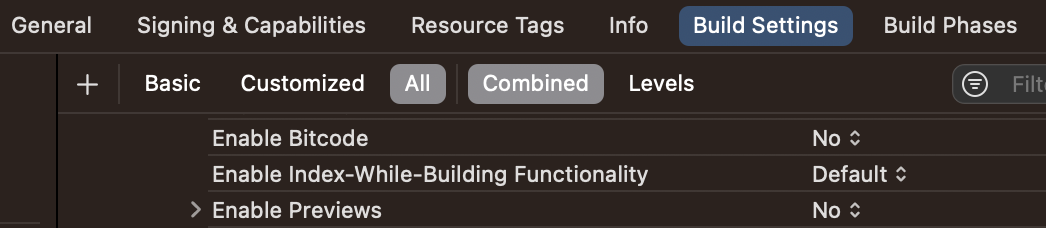
On Xcode 14 and below: As Zoom Video SDK does not support Bitcode, disable it under Build Settings > Build Options > Enable Bitcode > No.
Finally in the Info.plist add the required project permissions ("Privacy - * Usage Description") for Camera, Microphone, Bluetooth, and optionally Photo Library. The user will then explicitly grant these permissions to the app during runtime. More information on media permissions see here.

Initializing the SDK
Let’s get started by initializing the SDK so we have access to its functionality. For now, we’ll work in the StartViewController, where we first import ZoomVideoSDK to have the module.
In the setupSDK function, we’ll create an instance of the ZoomVideoSDKInitParams object and set the domain of the context to zoom.us. Then call the initialize function on the Video SDK from the main thread and verify it was correctly initialized.
let initParams = ZoomVideoSDKInitParams()
initParams.domain = "zoom.us"
let sdkInitReturnStatus = ZoomVideoSDK.shareInstance()?.initialize(initParams)
switch sdkInitReturnStatus {
case .Errors_Success:
    print ("SDK initialization succeeded")
default:
    if let error = sdkInitReturnStatus {
        print("SDK initialization failed: \(error)")
        return
    }
}
Joining a session
The remainder of the quickstart app will be take place in SessionViewController. Import the Zoom Video SDK here as well.
A session is a virtual meeting where two or more users communicate with each other over video and audio. Features like chat and screen sharing may be incorporated into a session.
To create or to join a session, you need to instantiate an ZoomVideoSDKSessionContext object and provide the following required properties:
token: Java Web Token created from Video SDK credentials during JWT Authentication.sessionName: The session’s unique identifier, which must match thetpcfield in the JWT. If the name is for a currently active session, then the SDK will join the session if all required parameters have been provided. If no active session exists with the name, then the SDK will create a new session for you. - The session name only needs to be unique to the app at the developer account level. Different developers may use the same session name, because different Video SDK apps cannot join each others’ sessions.userName: Display name of the user shown in the session. Default value is "null".
Optional additional properties:
sessionPassword: You may optionally specify a password for the session that attendees must enter.audioOption: Audio settings configurable inZoomVideoSDKAudioOptions.videoOption: Video settings configurable inZoomVideoSDKVideoOptions.
We will create the session context in the view controller's viewDidAppear callback using the data that you previously input. Once again, in a production app, you should not hardcode in the JWT or other credentials, which should be passed from the server.
// MARK: Session Information
/*
TODO: Enter the following variables needed to initialize the VSDK and to start/join a session
You should sign your JWT with a backend service in a production use-case. For faster JWT generation, you can navigate checkout the JWTGenerator.swift under Script folder and its README for more details on how to consume it.
Once you got the token, you can simple copy and paste it below.
Ensure that the sessionName matches the session name used to generate the JWT Token.
*/
let jwtToken = "" // Leave this as empty if you choose to copy and paste your generated JWT token directly in the sample app's alert box after clicking on "Join Session"
let sessionName = "" // Also known as tpc in JWT
let userName = "" // Display name
// ...
override func viewDidAppear(_ animated: Bool) {
    super.viewDidAppear(animated)
    presentJWTAlert()
}
func joinSession() {
    let sessionContext = ZoomVideoSDKSessionContext()
    sessionContext.token = jwtToken.isEmpty ? userInputJWT : jwtToken
    sessionContext.sessionName = sessionName
    sessionContext.userName = userName
    if ZoomVideoSDK.shareInstance()?.joinSession(sessionContext) == nil {
        print("Join session failed")
        showError(message: "Failed to join session")
        return
    }
}
private func showError(message: String) {
    Task { @MainActor in
        let alert = UIAlertController(title: "Error", message: message, preferredStyle: .alert)
        alert.addAction(UIAlertAction(title: "OK", style: .default) { _ in
            self.dismiss(animated: true)
        })
        present(alert, animated: true)
    }
}
Set up delegate callbacks
One of the powerful features of the Video SDK is the ability to receive notification status updates, such as operation results or failures, via delegate callbacks. Listen in by conforming to ZoomVideoSDKDelegate to receive all available session callbacks. We do so by creating an extension to conform to the protocol, and making sure that the delegate is set in the main implementation.
override func viewDidLoad() {
    ZoomVideoSDK.shareInstance()?.delegate = self
    // ...
}
extension SessionViewController: ZoomVideoSDKDelegate
Video
Our Video SDK app will include basic video, audio, and leave session controls. Let's go over each feature individually.
To display a user's video stream, first retrieve their corresponding ZoomVideoSDKUser object, then obtain a canvas. To render the video canvas' video stream, call the subscribe function, passing the view you would like to display its stream on, the stream's aspect mode, and its resolution. This must be done on the main thread. As the local user, we do this in the onSessionJoin callback that is called as soon as we enter the session.
func onSessionJoin() {
    guard let myUser = ZoomVideoSDK.shareInstance()?.getSession()?.getMySelf(),
            let myUserVideoCanvas = myUser.getVideoCanvas() else { return }
    Task(priority: .background) {
        addLocalViewToGrid()
        self.loadingLabel.isHidden = true
        self.tabBar.isHidden = false
        // Ensure video is started
        if let videoHelper = ZoomVideoSDK.shareInstance()?.getVideoHelper(),
            !(myUserVideoCanvas.videoStatus()?.on ?? false)
        {
            _ = videoHelper.startVideo()
        }
        myUserVideoCanvas.subscribe(with: self.localView, aspectMode: .panAndScan, andResolution: ._Auto)
        // Update UI to reflect video state
        self.localPlaceholder?.isHidden = true
        self.toggleVideoBarItem.title = "Stop Video"
        self.toggleVideoBarItem.image = UIImage(systemName: "video.slash")
    }
}
To start and stop displaying a user’s video, call the corresponding function with the video helper. Note that both return a ZoomVideoSDKError object. If the operation succeeds, a ZoomVideoSDKError with the value of Errors_Success is returned. It’s best to check the video canvas’ current status via videoStatus to determine which function to call. Starting and stopping video must be done on the main thread.
Disregard the following Xcode warning. SDK actions must be called on the main thread, which while making the UI freeze for a brief moment, is expected for the Video SDK.:
-[AVCaptureSession startRunning] should be called from background thread. Calling it on the main thread can lead to UI unresponsiveness
In the quickstart app, we place the logic for controlling video in tabBar(_:didSelect:) of the UITabBarDelegate under the first option of the UITabBar, toggleVideo.
private func handleVideoToggle(_ tabBar: UITabBar) {
    tabBar.items![ControlOption.toggleVideo.rawValue].isEnabled = false
    guard let canvas = ZoomVideoSDK.shareInstance()?.getSession()?.getMySelf()?.getVideoCanvas(),
            let videoHelper = ZoomVideoSDK.shareInstance()?.getVideoHelper(),
            let isVideoOn = canvas.videoStatus()?.on else { return }
    Task(priority: .background) {
        let _ = isVideoOn ? videoHelper.stopVideo() : videoHelper.startVideo()
        // Update UI to reflect new video state
        let newVideoState = !isVideoOn
        self.toggleVideoBarItem.title = newVideoState ? "Stop Video" : "Start Video"
        self.toggleVideoBarItem.image = UIImage(systemName: newVideoState ? "video.slash" : "video")
        self.localPlaceholder?.isHidden = newVideoState
    }
    tabBar.items![ControlOption.toggleVideo.rawValue].isEnabled = true
}
Audio
To control audio, we first confirm if the user is connected by fetching their ZoomVideoSDKAudioType. If they are not connected, then they must be connected before their audio can be controlled. In the quickstart app, we place the logic for controlling audio in tabBar(_:didSelect:) under the second option, toggleAudio.
private func handleAudioToggle(_ tabBar: UITabBar) {
    tabBar.items![ControlOption.toggleAudio.rawValue].isEnabled = false
    guard let myUser = ZoomVideoSDK.shareInstance()?.getSession()?.getMySelf(),
            let audioStatus = myUser.audioStatus(),
            let audioHelper = ZoomVideoSDK.shareInstance()?.getAudioHelper() else { return }
    if audioStatus.audioType == .none {
        audioHelper.startAudio()
    } else {
        let _ = audioStatus.isMuted ? audioHelper.unmuteAudio(myUser) : audioHelper.muteAudio(myUser)
        toggleAudioBarItem.title = audioStatus.isMuted ? "Mute" : "Start Audio"
        toggleAudioBarItem.image = UIImage(systemName: audioStatus.isMuted ? "mic.slash" : "mic")
    }
    tabBar.items![ControlOption.toggleAudio.rawValue].isEnabled = true
}
Responding to user events
We now know how to show the video of the local user. Next we will do the same for the remote user, making use of the callbacks that detect changes in user status.
To stream the other user's video, we get a reference to their user object in the onUserJoin callback once they enter the session, and then call subscribe on their video canvas accordingly.
func onUserJoin(_: ZoomVideoSDKUserHelper?, users: [ZoomVideoSDKUser]?) {
    guard let users = users,
            let myself = ZoomVideoSDK.shareInstance()?.getSession()?.getMySelf() else { return }
    for user in users where user.getID() != myself.getID() {
        let views = addRemoteUserView(for: user)
        remoteUserViews[user.getID()] = views
        if let remoteUserVideoCanvas = user.getVideoCanvas() {
            Task(priority: .background) {
                views.placeholder.isHidden = true
                remoteUserVideoCanvas.subscribe(with: views.view, aspectMode: .panAndScan, andResolution: ._Auto)
            }
        }
    }
}
The remote user can turn their video off and on, just like we can. When their video has the off status, we want to make sure we update the UI accordingly to show their placeholder instead of a blank view. When the video toggles back to on status, hide the placeholder. We do this in the callback that keeps track of when a user's video status has changed.
func onUserVideoStatusChanged(_: ZoomVideoSDKVideoHelper?, user: [ZoomVideoSDKUser]?) {
    guard let users = user,
            let myself = ZoomVideoSDK.shareInstance()?.getSession()?.getMySelf() else { return }
    for user in users where user.getID() != myself.getID() {
        if let canvas = user.getVideoCanvas(),
            let isVideoOn = canvas.videoStatus()?.on,
            let views = remoteUserViews[user.getID()]
        {
            Task(priority: .background) {
                views.placeholder.isHidden = isVideoOn
            }
        }
    }
}
Finally, we need to clean up when a user leaves, in the corresponding callback. To do this, we unsubscribe from any video or screen share canvases they might have been streaming with.
func onUserLeave(_: ZoomVideoSDKUserHelper?, users: [ZoomVideoSDKUser]?) {
    guard let users = users,
            let myself = ZoomVideoSDK.shareInstance()?.getSession()?.getMySelf() else { return }
    for user in users where user.getID() != myself.getID() {
        if let canvas = user.getVideoCanvas(),
            let views = remoteUserViews[user.getID()]
        {
            Task(priority: .background) {
                canvas.unSubscribe(with: views.view)
                if let container = views.view.superview {
                    container.removeFromSuperview()
                }
            }
            remoteUserViews.removeValue(forKey: user.getID())
        }
    }
}
Leaving a session
When the last participant leaves a session, it becomes inactive and available for reuse. Leave by calling leaveSession. In this app we'll do so in endSession, the third option of tabBar(_:didSelect:).
ZoomVideoSDK.shareInstance()?.leaveSession(true)
The callback onSessionLeave is triggered when the current user leaves the session. We want to make sure we unsubscribe from both local and remote users' video canvas when we have left the session.
func onSessionLeave() {
    if let myCanvas = ZoomVideoSDK.shareInstance()?.getSession()?.getMySelf()?.getVideoCanvas() {
        Task(priority: .background) {
            myCanvas.unSubscribe(with: self.localView)
        }
    }
    ZoomVideoSDK.shareInstance()?.getSession()?.getRemoteUsers()?.forEach { user in
        if let canvas = user.getVideoCanvas() {
            Task(priority: .background) {
                canvas.unSubscribe(with: self.videoStackView)
            }
        }
    }
    presentingViewController?.dismiss(animated: true)
}
And that’s how to make your first Video SDK app! Thank you for following along and using Zoom Video SDK for iOS. You can build other features like screen sharing, chat, cloud recording, and more. You can find more information under the Add Features section in our Video SDK docs.