Building a RAG chatbot on Zoom Team Chat using a vector database
In this blog post, we'll walk through the process of building a Retrieval-Augmented Generation (RAG) powered chatbot on Zoom Team chat. This chatbot will be trained on Zoom Mail and Calendar data, allowing users to query their upcoming meetings and emails directly within Zoom Team Chat.
Overview of the chatbot application
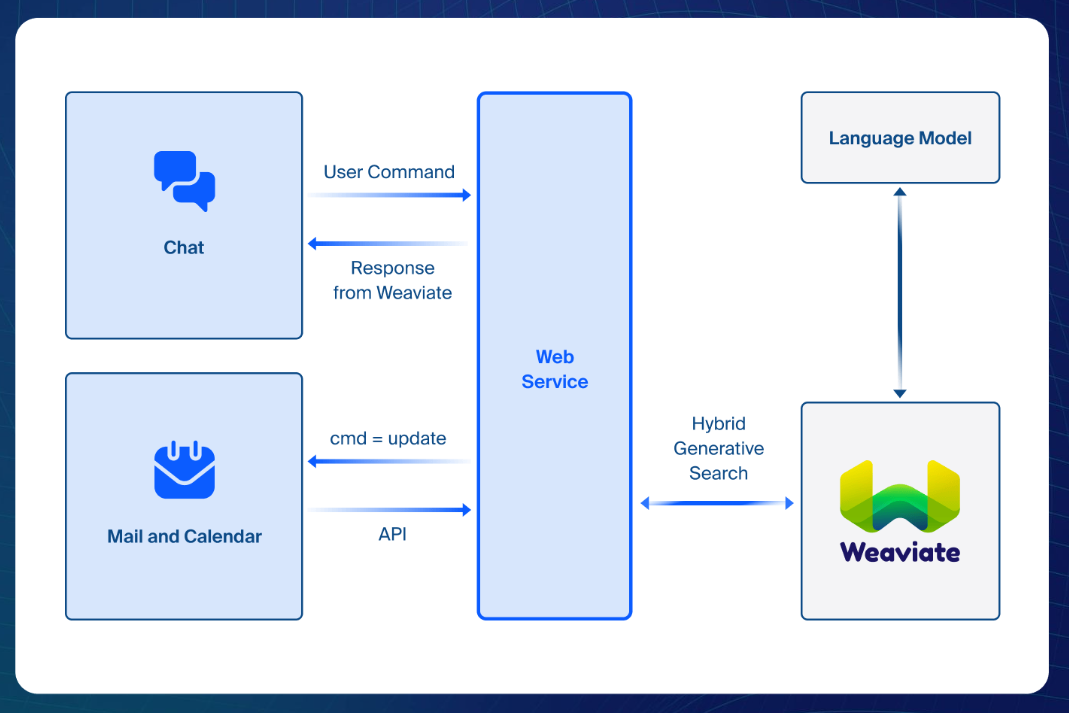
The chatbot we're building is designed to operate within Zoom Team Chat, and integrates directly with Zoom's Mail and Calendar APIs. Once integrated, the chatbot allows users to ask questions such as "When is my next meeting?" or "Do I have any important emails?" or "When is the upcoming offsite?" The chatbot processes these queries by performing a RAG-powered search across the user's mail and calendar data, returning relevant results directly in the chat interface.
Key Components:
- Zoom Team Chatbot configuration: Setting up the chatbot within the Zoom environment.
- Zoom Mail and Calendar APIs: Retrieving the necessary data from Zoom.
- Vector database: Storing and querying data for efficient retrieval.
- RAG (Retrieval-Augmented Generation): Enhancing the chatbot's ability to provide accurate responses.
Prerequisites:
Before diving into the code, we need to make sure that we have the following prerequisites:
- Zoom One Account: Ensure you have a Zoom One Pro, Standard Pro, Business, or Enterprise account with Zoom Mail and Calendar clients enabled with customized domains.
- Zoom Team Chat enabled: The chatbot relies on Zoom Teams Chat (this is a persistent chat) for sending and receiving messages, so make sure it’s enabled.
- End-to-end encryption disabled: Ensure that end-to-end encryption is disabled for Zoom Mail to allow API access.
- Zoom App configuration: Set up a Zoom App in the Zoom Marketplace with the required scopes for Mail, Calendar, and Chatbot APIs.
Configuring the Zoom Marketplace app
- Zoom Team Chatbot configuration:
- Log into the Zoom Marketplace and select to build a general (OAuth) app.
- Enter or update basic app information such as the app name, access type, and OAuth.
- Select the Zoom products and features that the app works with.
- Select the Zoom API methods (scopes) the app uses to interact with the Zoom platform. See step 3 for the specific scopes you'll need for this chatbot we're building.
- Preview your app and test it with internal users.
- App credentials:
- The build flow automatically generates app credentials (client ID & client secret) for your app. App credentials for development differ from app credentials for production. We will need these to auth access to Zoom API endpoints.
- Scopes:
- Mail:
- Legacy Scopes:
mail\:read,mail\:read\:admin
- Granular Scopes:
email\:read\:list\_msgs,email\:read\:list\_msgs\:admin,email\:read\:msg.email\:read\:msg\:admin
- Legacy Scopes:
- Calendar:
- Legacy Scopes:
calendar\:read,calendar\:read\:admin
- Granular Scopes:
calendar\:read\:list\_events,calendar\:read\:list\_events\:admin,calendar\:read\:event,calendar\:read\:event\:admin
- Legacy Scopes:
- Chatbot:
imchat\:bot
- Mail:
Implementing API calls for mail and calendar data
The heart of this chatbot lies in its ability to fetch and query data from Zoom Mail and Calendar. This involves making secure API calls and processing the returned data.
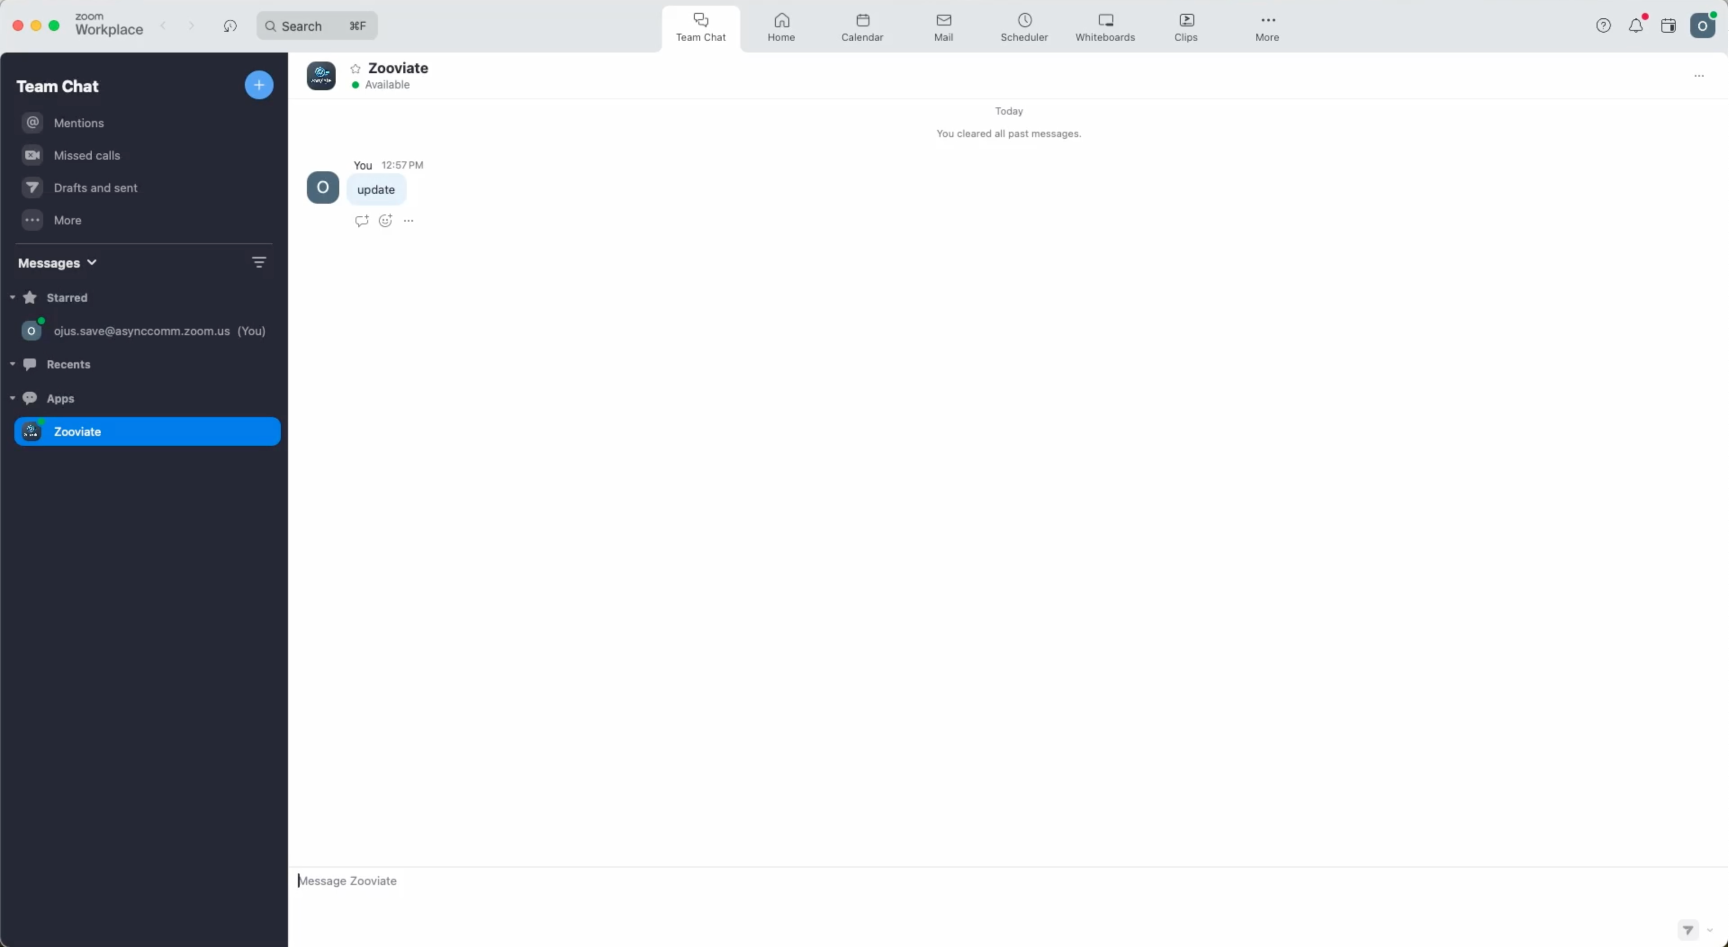
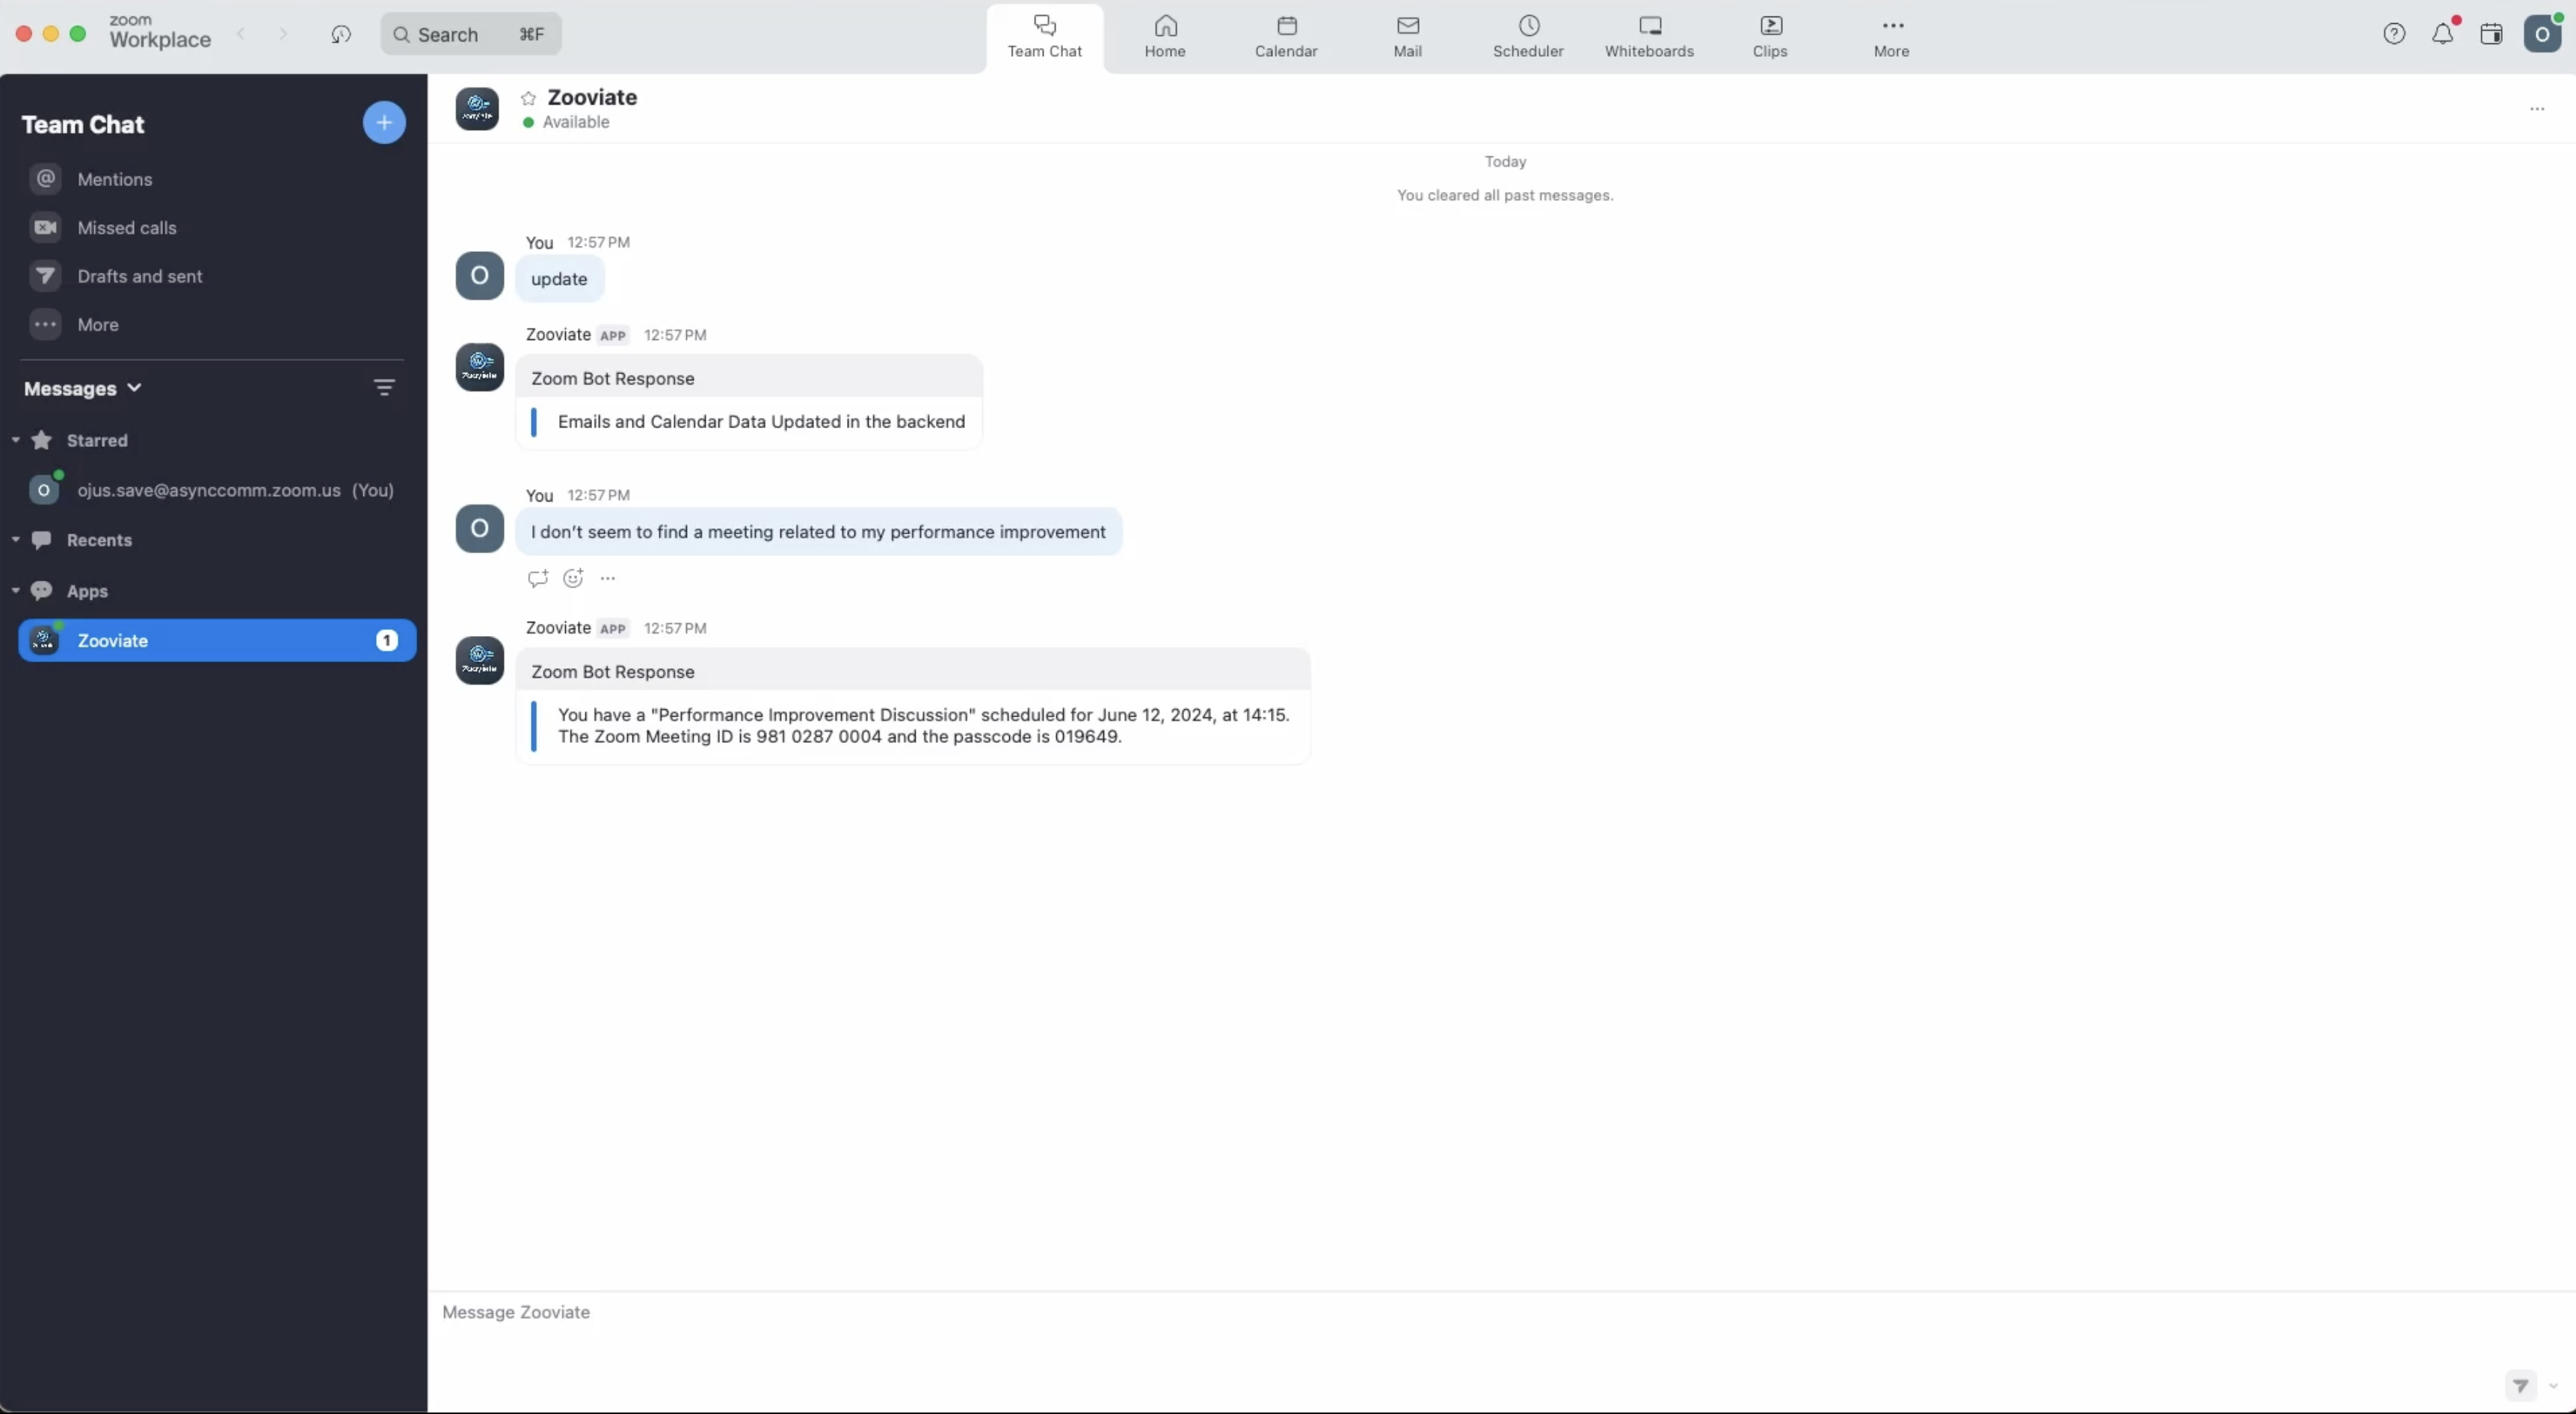
When the user sends the "update" message, the chatbot starts the process of fetching the latest email and calendar data. The chatbot first authenticates with Zoom's OAuth 2.0 protocol, obtaining an access token needed to access the user's data. After successful authentication, the chatbot makes API calls to Zoom’s Mail and Calendar endpoints to fetch the necessary data.
Authentication process
To interact with Zoom's APIs, your application needs to be properly authenticated. Zoom uses OAuth 2.0 for authentication, which involves obtaining an access token that grants your application permission to access the user's data.
OAuth Flow
The auth.js file in the zoom-server directory is responsible for managing the OAuth flow:
- Request authorization: Redirect users to Zoom's authorization server where they can grant access to your application.
- Exchange authorization code: Once authorized, exchange the authorization code for an access token.
- Access token usage: Use the access token to make API requests on behalf of the user.
Example:
async function getAccessToken(authorizationCode) {
    const response = await axios.post(
        "https://zoom.us/oauth/token",
        {
            grant_type: "authorization_code",
            code: authorizationCode,
            redirect_uri: process.env.ZOOM_REDIRECT_URI,
        },
        {
            headers: {
                Authorization:
                    "Basic " +
                    Buffer.from(
                        process.env.ZOOM_CLIENT_ID +
                            ":" +
                            process.env.ZOOM_CLIENT_SECRET,
                    ).toString("base64"),
                "Content-Type": "application/x-www-form-urlencoded",
            },
        },
    );
    if (response.status !== 200) {
        throw new Error(
            `Failed to get access token. Status: ${response.status} ${response.statusText}`,
        );
    }
    console.log("Access Token Response:", response.data);
    return response.data.access_token;
}
module.exports = { getAccessToken };
Fetching email data
The emailAPI.js file in the zoom-server directory handles the logic for retrieving emails. Here's a simplified example of how you can implement an API call to fetch email data:
const axios = require('axios');
async function getEmails(accessToken) {
   const response = await axios.get('https://api.zoom.us/v2/users/me/emails', {
       headers: {
           'Authorization': `Bearer ${accessToken}`
       }
   });
   return response.data;
}
Fetching calendar data
Similarly, the process for fetching calendar events is handled by the same principles. The calendarAPI.js file would include logic similar to this:
async function getCalendarEvents(accessToken) {
   const response = await axios.get('https://api.zoom.us/v2/users/me/calendar/events', {
       headers: {
           'Authorization': `Bearer ${accessToken}`
       }
   });
   return response.data;
}
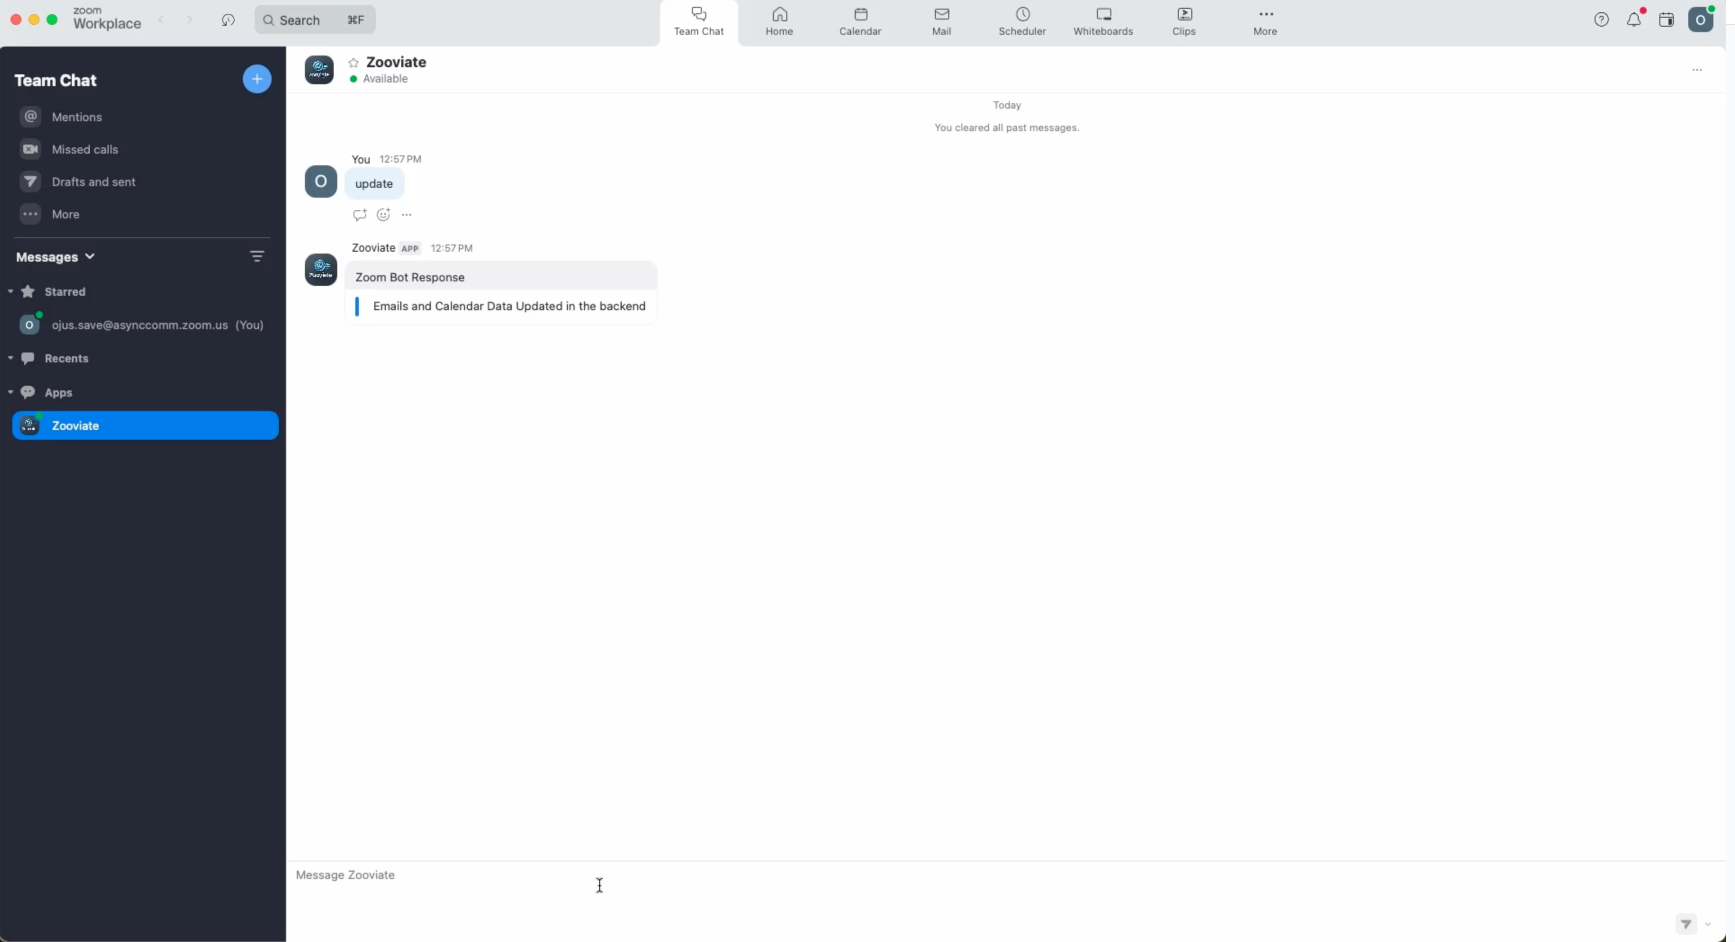
Once the data is fetched, you will receive a message in your team chat app saying that the "Email and Calendar Data has been updated"
Storing data in vector database
Once the data is fetched from Zoom Mail and Calendar, it needs to be stored in a vector database as vector embeddings. This process involves converting the textual data into vectors using a models like text2vec-openai, and then sending these vectors to a vector database.
What is a Vector database and why are we using one?
A vector database stores data as vectors (arrays of numbers) rather than traditional tables and rows. These vectors represent the semantic meaning of data (such as the content of an email or calendar event) in a high-dimensional space. When a user queries the chatbot, the vector database is searched for the most relevant vectors, allowing the AI to retrieve the most contextually appropriate information. In this sample app we are using weaviate as our vector database.
Integrating AI and RAG
With the Zoom data at your disposal, the next step is to integrate AI to enhance the chatbot's capabilities. This is where Retrieval-Augmented Generation (RAG) comes into play. RAG combines the power of retrieval-based and generative models to deliver accurate and context-aware responses.
RAG architecture
The RAG model retrieves relevant documents (emails, calendar events) from a knowledge base (vector database) and generates a response based on this data. This approach ensures that the chatbot provides accurate and relevant information, even when dealing with complex queries.
Implementation:
- Retrieval phase: The chatbot first retrieves the most relevant data from the vector database based on the user's query.
- Generation phase: It then generates a response using a language model like GPT-4, augmented with the retrieved data.
Querying the vector database
Once the data is stored in vector database, it can be queried using the /query endpoint. This endpoint will perform a hybrid search, combining semantic and keyword-based search, to find the most relevant data. The result is then used by the AI model to generate a response.
async function queryDatabase(query) {
   const result = await weaviate.query(query)
       .withFields('id content')
       .do();
   return result;
}
Sending chatbot messages to Zoom Team Chat
Once we've retrieved and processed the relevant data from our vector database, the final step is to send the response back to the user through Zoom Teams chat. This is accomplished using Send Chatbot Message API.
Using the send chatbot message API endpoint
Zoom's chatbot message API endpoint allows us to send messages programmatically to a Zoom chat. Here's how we can implement this:
async function sendChatbotMessage(accessToken, userId, message) {
   try {
       const response = await axios.post('https://api.zoom.us/v2/im/chat/messages', {
           robot_jid: process.env.ZOOM_BOT_JID,
           to_jid: toJid,
           user_jid: toJid,
           content: {
               head: {
                   text: 'Zoom Bot Response'
               },
               body: [{
                   type: 'message',
                   text: message
               }]
           }
       }, {
           headers: {
               'Content-Type': 'application/json',
               'Authorization': 'Bearer ' + chatbotToken
           }
       });
       console.log('Message sent successfully:', response.data);
       return response.data;
   } catch (error) {
       console.error('Error sending message:', error);
       throw error;
   }
}
This function constructs the message payload and sends it to the Zoom API. The chatbotToken is used for authentication, and the toJid specifies the recipient of the message.
Generating the chatbot token
To use the send chatbot message API endpoint, we need to authenticate our requests using client credentials. For a chatbot, we typically use the Client Credentials grant type, which allows our application to authenticate itself without user interaction.
Here's how we can implement the OAuth flow using client credentials:
async function sendChatbotMessage(accessToken, userId, message) {
   try {
       const response = await axios.post('https://api.zoom.us/v2/im/chat/messages', {
           robot_jid: process.env.ZOOM_BOT_JID,
           to_jid: toJid,
           user_jid: toJid,
           content: {
               head: {
                   text: 'Zoom Bot Response'
               },
               body: [{
                   type: 'message',
                   text: message
               }]
           }
       }, {
           headers: {
               'Content-Type': 'application/json',
               'Authorization': 'Bearer ' + chatbotToken
           }
       });
       console.log('Message sent successfully:', response.data);
       return response.data;
   } catch (error) {
       console.error('Error sending message:', error);
       throw error;
   }
}
Now that we have generated the chatbot token, we can use it to send messages to Zoom Team Chat. With this final piece in place, our RAG-powered chatbot is complete and ready to interact with users!
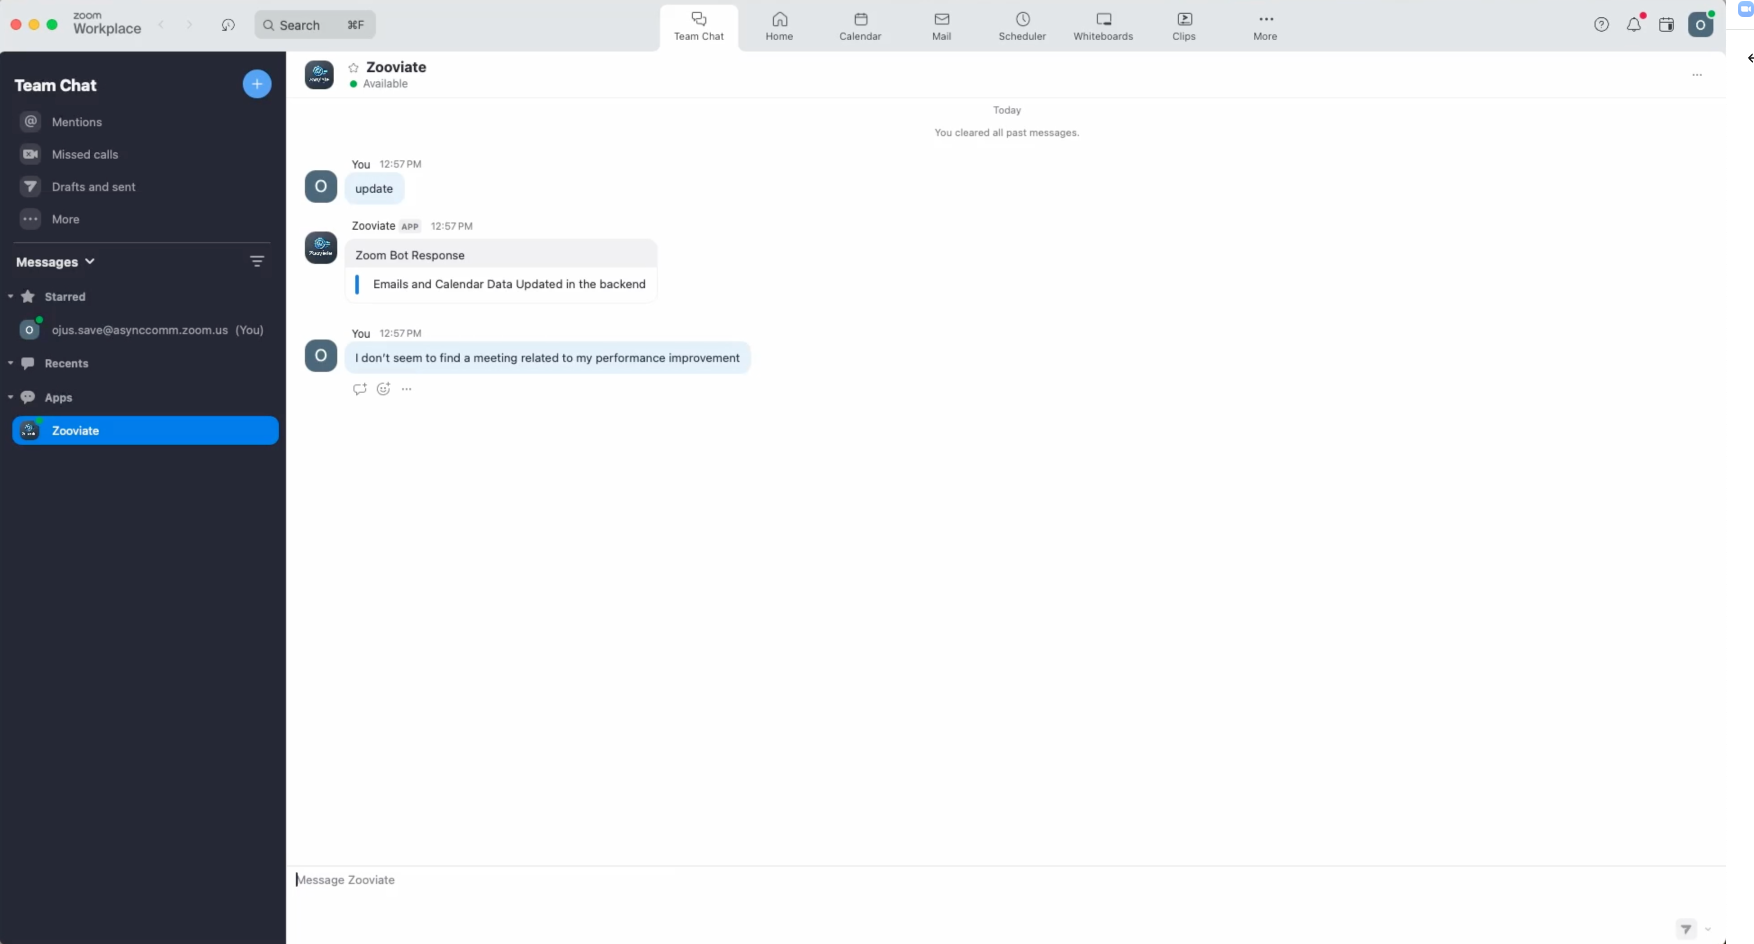
Users can now send queries about their emails and calendar events directly in Zoom Chat, and the chatbot will respond with relevant information. For example, if a user asks "What's my next meeting?", the chatbot will query the vector database, retrieve the most relevant calendar information, and generate a response using the RAG model.
This chatbot demonstrates the power of combining Zoom's APIs, vector databases, and advanced AI techniques to create a useful tool for enhancing team productivity. By providing quick access to personalized information within the Zoom environment, users can stay informed and organized without leaving their primary communication platform.
Remember, this is just the beginning. You can further enhance this chatbot by:
- Expanding its knowledge base to include other types of data
- Implementing more sophisticated natural language processing
- Adding features like meeting scheduling or email summarization
- Customizing the AI model to better fit your organization's needs
I hope this blog post has inspired you to explore the possibilities of AI-powered chatbots in team collaboration. Whether you're looking to streamline communication, boost productivity, or create innovative solutions for your organization, the framework we've discussed here provides a solid foundation to build upon.
You can take the concepts discussed here, experiment with them, and adapt them to your unique needs. The world of AI and team collaboration is rapidly evolving, and who knows, your ideas could lead to the next breakthrough in how we work together. We're excited to see the creative and impactful solutions you'll develop using these tools and techniques.
Remember, the journey of building AI-enhanced applications is as rewarding as the destination.
Happy coding, and may your chatbot adventures be both fun and fruitful!
Ready to start building your own Chatbot?
Here are some resources for you to get started: