Authentication
In-Client OAuth for Zoom Apps API
Zoom Apps In-Client OAuth offers a significant user experience improvement over the traditional web-based install flow to exchange an authorization code for an access token. This feature enables the Zoom app to trigger the exchange and receive of the access token within the Zoom client.
This feature includes:
- In-Client Add app: enable users to add the app from within the Zoom client.
- Retrieval of Zoom REST API OAuth tokens.
- In-client prompts for users to authorize updated scopes.
Enabling in-client OAuth for your app
1. Enable in-client OAuth in the build flow
- Login to the Zoom portal and go to Manage App -> your app -> Features, and enable In-client OAuth.
- Under the OAuth allow list section, add your app's Home URL.
2. Use the authorize method and onAuthorized event in your app
The authorize method and the onAuthorized event are the in-client equivalent of a grant_type authorization_code request to the Zoom REST API to get the access token.
This in-client flow involves two steps for developers:
-
Invoke the authorize method with PKCE code_challenge (only code_challenge_method
plainis supported) and optional state:- If the app's scopes are authorized by the user, it starts a non-interactive OAuth flow, completely invisible to the user.
- If the app's scopes have changed or added, it goes to the in-client consent screen, and the user is prompted to reauthorize the app's scopes.
-
Listen for an onAuthorized event with an authorization code.
Your app needs to register a listener callback function for the onAuthorized event. The callback function is invoked after the Zoom Client internally checks if the user has authorized the app's scopes. The event includes the user authorization code the app sends to the application server to request an access token for the Zoom REST API.
To use the method and event in your app:
-
Add authorize and onAuthorized to capacities in the config call on Zoom App client.
windows.onload() = function () { zoomSDK.config({ capabilities: [ "getRunningContext", "getSupportedJsApis", "openUrl", // add here: "authorize", "onAuthorized" ] }) }; -
Invoke the Zoom Apps SDK
authorizemethod with the following parameters:- A PKCE code_challenge. Only PCKE method 'plain' is supported
- An optional state value.
ZoomSdk.authorize({ state: "TIA5UgoMte", codeChallenge: "lkjqwp4rt9uq03wr", }) .then((ret) => { console.log(ret); }) .catch((e) => { console.log(e); }); -
Register and listen for the
onAuthorizedevent using the Zoom Apps SDK addEventListener method.zoomSdk.addEventListener("onAuthorized", function (event) { console.log(event); $.post("/api/v1/auth/token", event, function (data, status) { console.log("Data " + data, "\nStatus: " + status); }); }); -
(Optional) Verify the state value received in
onAuthorizedis the same as the value passed from the app to theauthorizemethod. -
From the application server, send a token request with the code_verifier used to generate the code_challenge. This completes the In-Client OAuth flow: the application server has received an access token for the Zoom REST API.
Migrating and supporting traditional web-based installations
Keep the following in mind when migrating from web-based installs to Zoom App in-client adds:
- That the in-client OAuth feature does not replace the traditional web-based install flow. Your app must continue to support the install flow from the Zoom Marketplace and your own install pages.
- You must re-implement any extraneous functionality that takes place during the traditional (web-based) install flow, such as getting and saving user OAuth tokens for the Zoom API.
- Some applications also create application users, create sessions, and more. These will have to be supported in the backend handler for the app's home url using the X-Zoom-App-Context header on that request.
Testing adding apps during development
The in-client app flow to add an app is not available for unpublished apps. To test your app during development, we suggest these workarounds:
-
Single user
Add your app and send it to yourself. Then remove the app, and add it in a way that triggers the in-client oauth flow.
- Log into Zoom marketplace web portal and add your app to your user account.
- Open the Zoom client and start a meeting.
- Open your app, and send the app invitation to all participants.
- In the Zoom client, close the app, but do not end the meeting.
- Go to the Zoom marketplace and remove the app.
- Return to the meeting in the Zoom client, locate the app invitation in the chat tab, and accept it.
-
Two users (two Zoom instances)
Add the app to your Zoom account and then invite another user to add the app.
- User1 logs into Zoom marketplace web portal and adds the app to their user account.
- User1 opens the Zoom client and starts a meeting.
- User2 (who hasn't added the app) joins the meeting.
- User1 sends User2 an invite to add the app.
- User2 locates the app invitation in the chat tab, and clicks it to accept the invitation.
Third-party OAuth (optional)
In many cases, OAuth can be conducted within the Zoom Apps app in the client. This is the least complex approach. In some situations, users of an app may not want to enter their credentials directly in and app and some OAuth providers do not allow user agents that are not standalone browsers. In that instance, the OAuth flow will need to involve an external browser.
Care must be taken when implementing OAuth in an external browser. The OAuth flow must finish in the same session that it began. The below is on example of how to implement OAuth that does this. It involves calling zoomSDK.openURL to begin the authorization flow which returns the authorization_code using the API endpointhttps://api.zoom.us/v2/zoomapp/deeplink. The deeplink causes the browser to open the app and pass the authorization_code back.
The implementation details may vary depending on the provider you use. The diagram below provides a basic overview how this works:
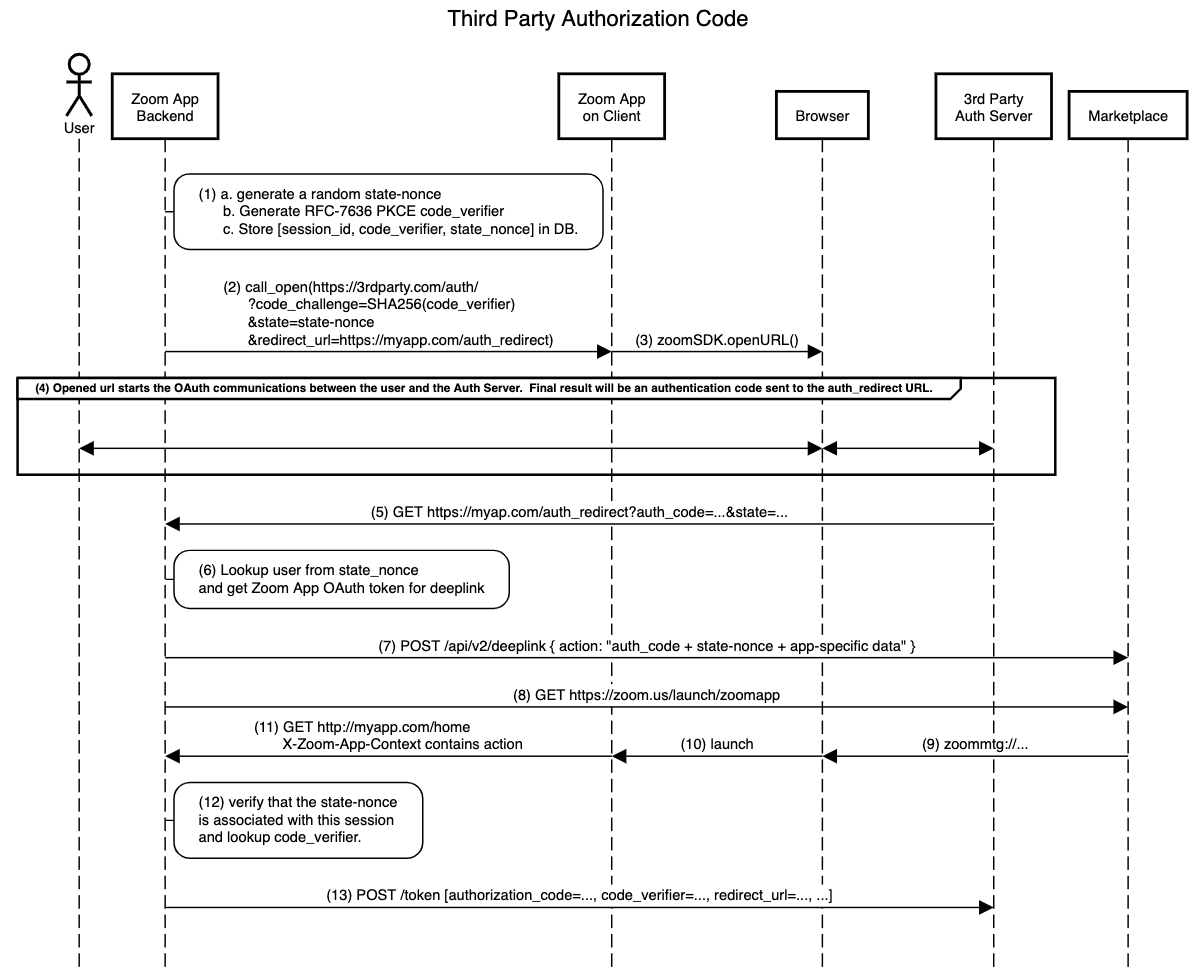
The steps shown in the above diagram are described below:
- When the app first connects to the backend, create a session identifier and put it in a cookie.
- When the app backend wants to start third party OAuth (possibly because a user requests it or possibly as the first step in app launch), this following sequence begins.
- (1) Generate a
state-noncethat can be used to lookup the Zoomuser_idin step (6) and a PKCEcode_verifierthat will be used in step (11) - (2,3) Open the authorization GET request in the browser.
- (4,5) Normal authorization code OAuth happens ending with the authorization code being sent to the
auth_redirectURL. - (6) Use the state-nonce in the state parameter to lookup this
user_idand retrieve the Zoom OAuth Token.
Although it is possible to retrieve the OAuth token at this point and skip steps 7-13, that is not a secure approach. If Bob took the link from step 3 and got Alice to visit that link and authorize in step 4, Alice's 3rd party resources would be bound to Bob's session and Bob could access them from the app.
- (7) Use the OAuth token to retrieve a deep link that will open an app for this user.
- (8) Send the deeplink to the backend.
- (9) The backend goes to the
zoommtg://schema. - (10) The browser opens the Zoom Client and the Zoom Client uses the payload to open the app.
- (11) The app is launched at its homepage with the
auth_codeandstate-nonceembedded in the payload. - (12) Verify that the
state-nonceis associated with this session identifier and lookup the PKCE token associated with thisstate-nonce. - (13) Do standard PKCE token acquisition from the backend.
PKCE
If the third party authorization server does not support PKCE, it can be left out of this process.
Login-in forms - best practices
To reduce friction for users signing into meetings, we recommend you guide users to complete required authentication steps before meetings start, and to use Guest Mode for first time users of your app during the meeting.
- Link accounts with zoom user_id. Use user_id to restore user sessions and avoid repeated authentication requests.
- Avoid using cookie sessions. Cookies are removed when users log out of meetings and trigger re-authorizations when they log in again. Instead, use
user_id, which is available in the app context header. - Leverage system browser authentication sessions. If your users have active sessions with your service in their default browser, you can reduce friction by sending users to the browser using OpenURL and capturing the active authentication from the browser.
- Use system browsers for OAuth authentication. Authentication providers can block app credentials in embedded browsers. Your app can, instead, access the user credentials saved in system browsers for authentication.
- Use first-party login and password forms in embedded views.